
Operator and Customer Service
You are the first set of human eyes on applications that did not pass the automated checks. Open each flagged application, understand why it was flagged, verify the client identity, then approve, decline, refer to Compliance, or start a supporting eKYC flow for more information.
Queue · Biometrics · Decisions · ClientsAbout this guide
This guide is for Customer Service teams that use the Assentify Digital Experience Platform (DXP) every day. Your team reviews applications that the automated checks flagged for a human look. The work is simple to state: read each flagged application, understand the flag, then decide.
Once you approve an application, the platform runs AML Screening. If the screening returns a match on the name, the application stops for Compliance review in the second step of onboarding. Your most important job is to verify the client identity. Confirm that the first name and last name submitted match the provided ID exactly, so screening runs against the correct name.
Signing in and around the platform
Sign in with a work email that ends in your tenant domain. Any other email is rejected.
- Open the DXP URL provided by your administrator.
- Enter your work email and press Sign In.
- Enter your password and press Login.
- If two factor authentication is on, enter the six digit code from your authenticator app.
Once signed in, the left side menu shows Dashboard, Interactions, and Clients. As an operator you will mostly use Interactions and Clients.
Your queue: the Interactions screen
What it is. An interaction is one client submission travelling through a flow. The Interactions screen is where flagged interactions wait for your review.
Interactions is a nav group, not a single page. Navigating straight to /interactions renders an empty screen, so always open it through the flyout. There are three hover levels before the list appears.
- Hover Interactions on the side menu. A flyout opens listing every flow your tenant runs, for example SDKDemo, Demo flow, Flow 4, and Flow 5.
- Hover a flow. Certain flows, such as SDKDemo and Demo flow, show a right arrow that opens a further sub-submenu of interaction categories. Expand it.
- Press the leaf you have been assigned to open its Application Processing Command Center and its interactions list.
Reading the Application Processing Command Center
The Application Processing Command Center is the screen inside a Backend Block step where you review and decide on flagged interactions. The page title comes from the flow; this guide assumes it reads Application Processing.
Top right you have a History / Real Time toggle and an Export button. Below sit a Filters card, then a legend row that explains the row colors.
| Flag | Color | What it means |
|---|---|---|
| KYC | Red | The application has a KYC concern. The most common cause is an expired or about to expire ID document. |
| AML | Orange | The AML screening engine found at least one possible match against a watchlist. |
| Modified | Yellow | An is_dirty flag fired. A value that OCR, transliteration, or translation auto-populated into an Assisted Data Entry field was changed by the client after it was filled in. |
Filtering, Real Time, and History
The Filters card holds every filterable field your administrator has exposed. For the example flow these are First Name, Last Name, Birth Date, Document Number, Expiry Date, Country, Sex, and ID Type.
- Type a value into the field you want to filter on.
- Press the circular search button on the right of the Filters card.
- Use the Real Time view for incoming work: interactions that no decision has been made on yet.
- Use the History view for interactions where a decision has already been made, using one of the flow's defined decisions.
Why a row is flagged
The yellow Modified flag is the one your team will see most often. It is the platform telling you the application is worth a manual look. The exact cause varies.
Auto-filled field edited by the client
A value that OCR, transliteration, or translation auto-populated into an Assisted Data Entry field was changed by the client after it was filled. Sometimes it fixes a bad extraction or a poor transliteration. Sometimes it is a client altering a name or date of birth to push incorrect data through.
Low face match score
The live selfie compared poorly against the extracted face from the ID document. The Match Percentage is shown in the expanded row.
ID authenticity manual review
The document authenticity engine wants a human to look. The captured ID image is in the expanded row.
Tampering detected
A face replace was detected (the live face was overlaid on the document image) or a data replace was detected (a fake card was placed over the real card). The platform protects against both and surfaces the case to you.
Wrong Template detected
The document presented does not match the selected document type. The signal fires from a templated check that inspects fixed card locations against the expected template.
Working a single application: expanding the row
Press the plus icon at the left of the row. The row expands to show every data point captured by the flow. The buckets on show are configurable from the settings icon next to the page title.
- Press the plus icon at the left of the row to expand it.
- Review the Selfie and reference face shown side by side. A red Manual Verification Required banner appears on the selfie when the system wants a human look.
- Press the Compare button to open the Image Comparison tool for a closer look before you decide (covered next).
- Check Device Name, Flow Name, and User Agent to see what device and SDK ran the flow. These help when fraud patterns cluster around a device.
- Read Time Started and Time Ended. Very short or very long times are signals.
- Inspect the captured ID document image. Check for blur, glare, or the edge of a second card peeking out.
- Compare the Match Percentage, the live face to ID face score, against your tenant threshold.
Image Comparison: verify the faces yourself
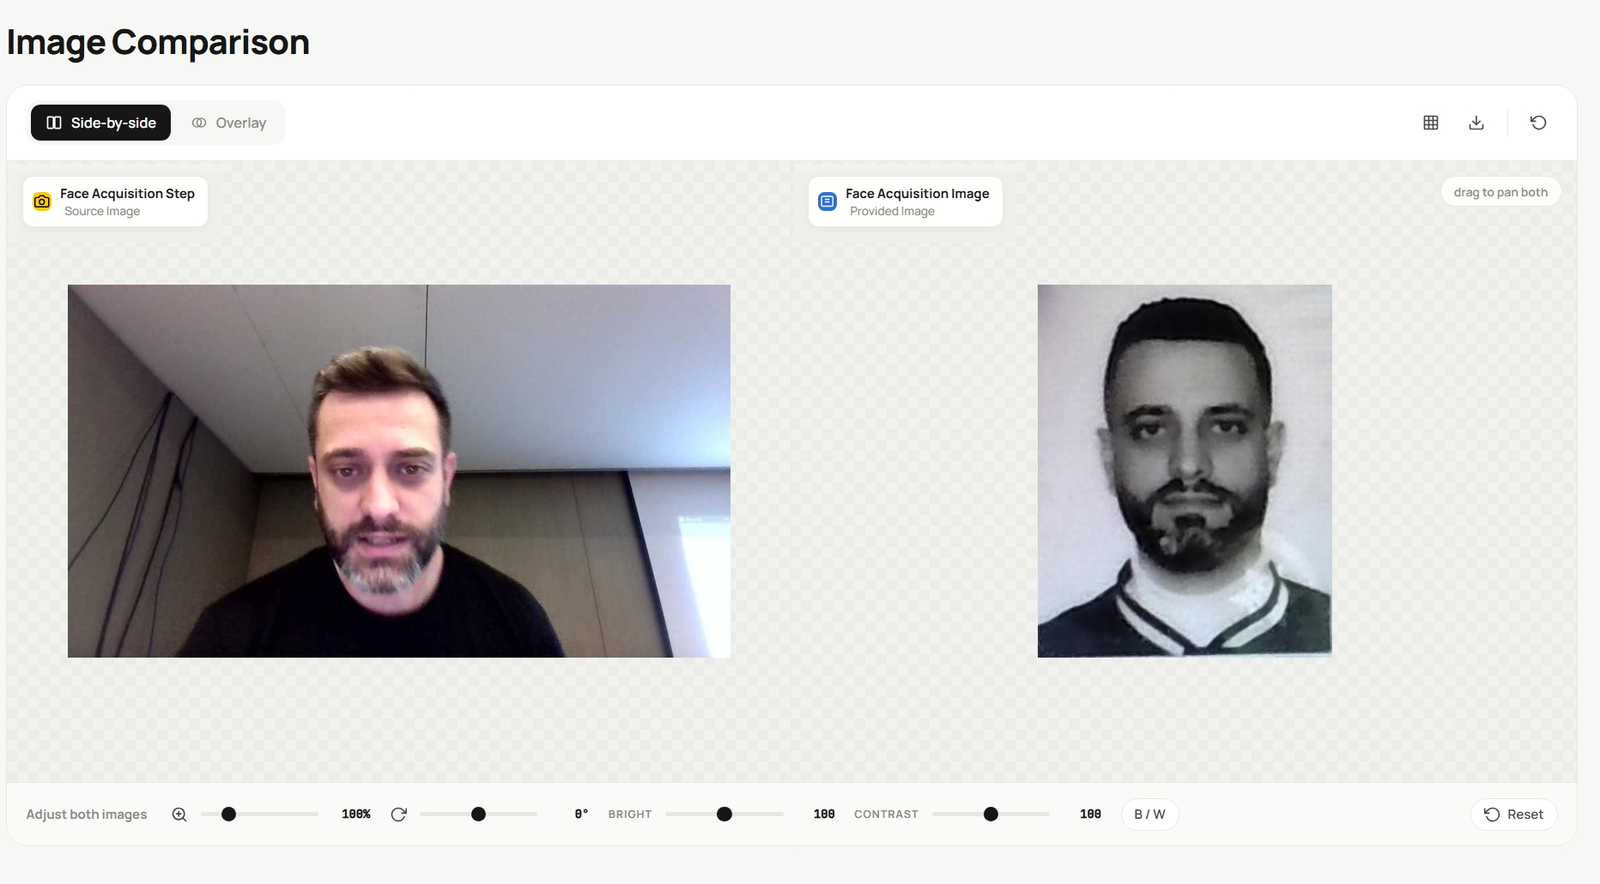
When you want to confirm a face match by eye, press Compare in the biometric panel. It opens the Image Comparison tool. The tool puts the live selfie (the Face Acquisition Step source image) next to the face from the ID (the Face Acquisition Image provided image), so you can make a manual verification.
- Press Compare to open Image Comparison.
- Choose Side-by-side to see both images next to each other, or Overlay to lay one over the other.
- Use the controls to line the faces up: zoom, rotate, Bright, Contrast, and the B / W toggle. Drag to pan both images together.
- Turn on the grid to line up features, and reset any adjustment with Reset.
- Make your call, then return to the row to decide.
Biometric duplicate check: is this already a client?
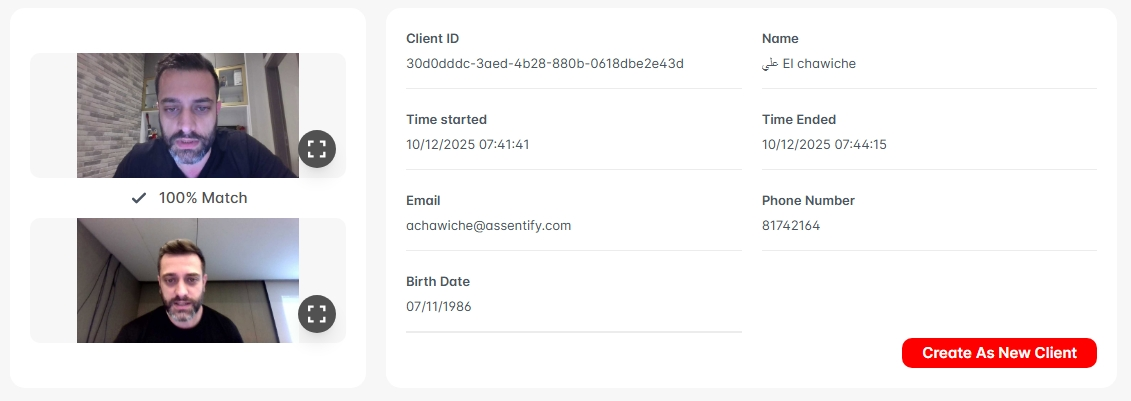
This is the main control for client uniqueness across your Clients (the CRM section). Using the latest face biometric engine, the platform compares the live selfie in this engagement against every registered client. If it finds the same face, the panel shows the matching client so you can decide what to do.
- Read the match panel. It shows the live selfie next to the existing client's face with a match score, for example 100% Match.
- Check the matched client's details: Client ID, Name, Time Started and Time Ended, Email, Phone Number, and Birth Date.
- Decide. Press Create As New Client to fork a new client record, or keep the existing client if this is the same person returning.
Configure Layout: design your own queue
This is the most important control on the page. The settings button at the top, next to the page title, opens Configure Layout. It lets you define the exact layout and look and feel of the queue: which data points show as columns, which show only when a row is expanded, and how the table reads. When you save, the queue auto-reflects the new layout with the real interaction data straight away, for you and for everyone on this queue.
The interactions page layout is built entirely from the data keys the flow already collected. Every data point captured by the engagement steps and any earlier blocks appears in a list, grouped by the step that captured it. You design the queue by dragging those keys where you want them.
Naming the source steps helps you predict which keys will exist to drag. Identification Document Capture yields the document number, expiry, and MRZ fields. Assisted Data Entry yields whatever field types the form used, drawn from 14 types including Nationality, Phone Number With OTP, Date, and Drop Down. If a key is not in the list, the flow never captured it. See the Flow Builder guide for the full step catalogue.
- Press the settings button at the top of the page, next to the title, to open Configure Layout.
- Find the data point you want in its capture step group.
- Drag it to a column to show it on every table row.
- Drag it to the expanded section to show it only when an operator opens the row with the plus icon.
- Arrange the order and grouping until the queue reads the way your team needs.
- Press Save. The table redraws immediately and shows the real interaction data in the new layout.
Editing an engagement (fully audited)
Sometimes a captured value needs a correction before you decide. The edit icon on the engagement lets you edit the submitted data in place. Every edit is fully audited: the platform records who changed what, from which value to which value, and when, so the change is always traceable.
- Press the edit icon on the engagement.
- Change the value that needs correcting.
- Save. The new value applies to the interaction, and the edit is written to the audit trail.
Decide
The decision buttons at the bottom of the expanded row are exactly the decisions defined for this Backend Block in the Flow Builder. There is no fixed set. What you see, and what each button does next, is whatever the flow's Automated Decisions and decision routes were configured to do. Common examples are Approve, Decline, and Refer to Compliance.
- Review the biometrics, the captured ID, and the Match Percentage in the expanded row.
- Fill any required pre-processing field, for example a reviewer note.
- Press the decision your flow defines, for example Approve, Decline, or Refer to Compliance.
- The interaction leaves your queue and routes along the path that decision points to.
Getting more information vs declining
The platform does not send an application back to the client to redo the same flow. If you need more information or documents, the flow can be built to start a supporting eKYC flow that collects exactly what is missing. If the application is not acceptable, you decline it.
When a client can supply what is missing, a follow-up support flow is the right path. A decision defined for this purpose starts a supporting eKYC flow that requests the extra information or documents, for example a clearer document or proof of address. The client completes that short follow-up flow, and the new data joins the interaction.
Use Decline when the application is clearly not acceptable. Examples: confirmed fraud or an attempt to open multiple wallets, confirmed tampering, or a client your tenant does not accept.
Verify the name against the ID before you approve
Screening only works if the first name and last name match the provided identity document exactly. A correct name means any real match is caught in the Compliance step. Check every field that carries a yellow flag against the document.
Working with Client Profiles
The Clients section stores every person or business that has completed a flow. As an operator you dip in here when a returning client needs help.
- Press Clients on the side menu.
- Pick the client profile type tab at the top: Person, Verified Person, or Verified Business.
- Use the Filters card or the search button to find the client.
- Press the row to open the client profile.
A client profile holds these sections.
| Section | What it holds |
|---|---|
| Basic Information | Configured for your tenant, usually similar to a CRM. |
| Status | Active, inactive, AML flagged (red), KYC flagged (red), or Modified (yellow). |
| Documents | Every document captured or signed across the client history. |
| KYC Documents | Every ID captured, with expiry and document number. |
| History of Interactions | Every flow this client has been through. |
| AML Screening History | Every screening that ran and the result. |
Sharing a flow link
A published flow is exposed to clients via a link, a QR code, or an SDK. When a client needs to start or restart a journey, share the flow link.
- Open Flow Manager and select the flow you use.
- Copy the Digital Engagement Link for the client to open on their phone.
- Or show the Digital Engagement QR Code for the client to scan.
- To send by email, type the address under Share Links and send it.
Communication chat
What it is. In-app chat with clients. Use it to help a client who is stuck mid-journey or to follow up after onboarding.
- Open Communication on the side menu.
- Pick a chat from Active Chats.
- Reply in the message pane.
Branch Assisted Mode
What it is. Branch Assisted Mode is the same engagement, leveraged by an agent at your counter instead of the client on their own phone. An agent, teller, relationship manager, or counter operator runs the flow's Engagement Block on behalf of the client, so the whole capture and signing experience happens over the counter. It is the same flow you publish for self-service, presented for an assisted, in-branch session.
- Sign in to the agent portal at agents.assentify.com (for this tenant, paytabs.agents.assentify.com) with your agent credentials. The portal is branded for your institution and marks you as a Teller.
- You land on your teller dashboard: a personal greeting, a live clock, and My queue with In Progress, Waiting, and Done today filters, plus a Find session, flow type search.
- Start a session. Click + New Flows and pick the flow you are assigned to run, for example Demo flow. The engagement opens as a teller session with its own session reference.
- Work through the block with the client at the counter. Each engagement page is laid out for speed, with keyboard shortcuts, so you capture the ID, the selfie, the form entries, and the signature on the client's behalf.
- Submit the interaction. From here it follows the same path as a client-run flow: screening, scoring, and the review queue.
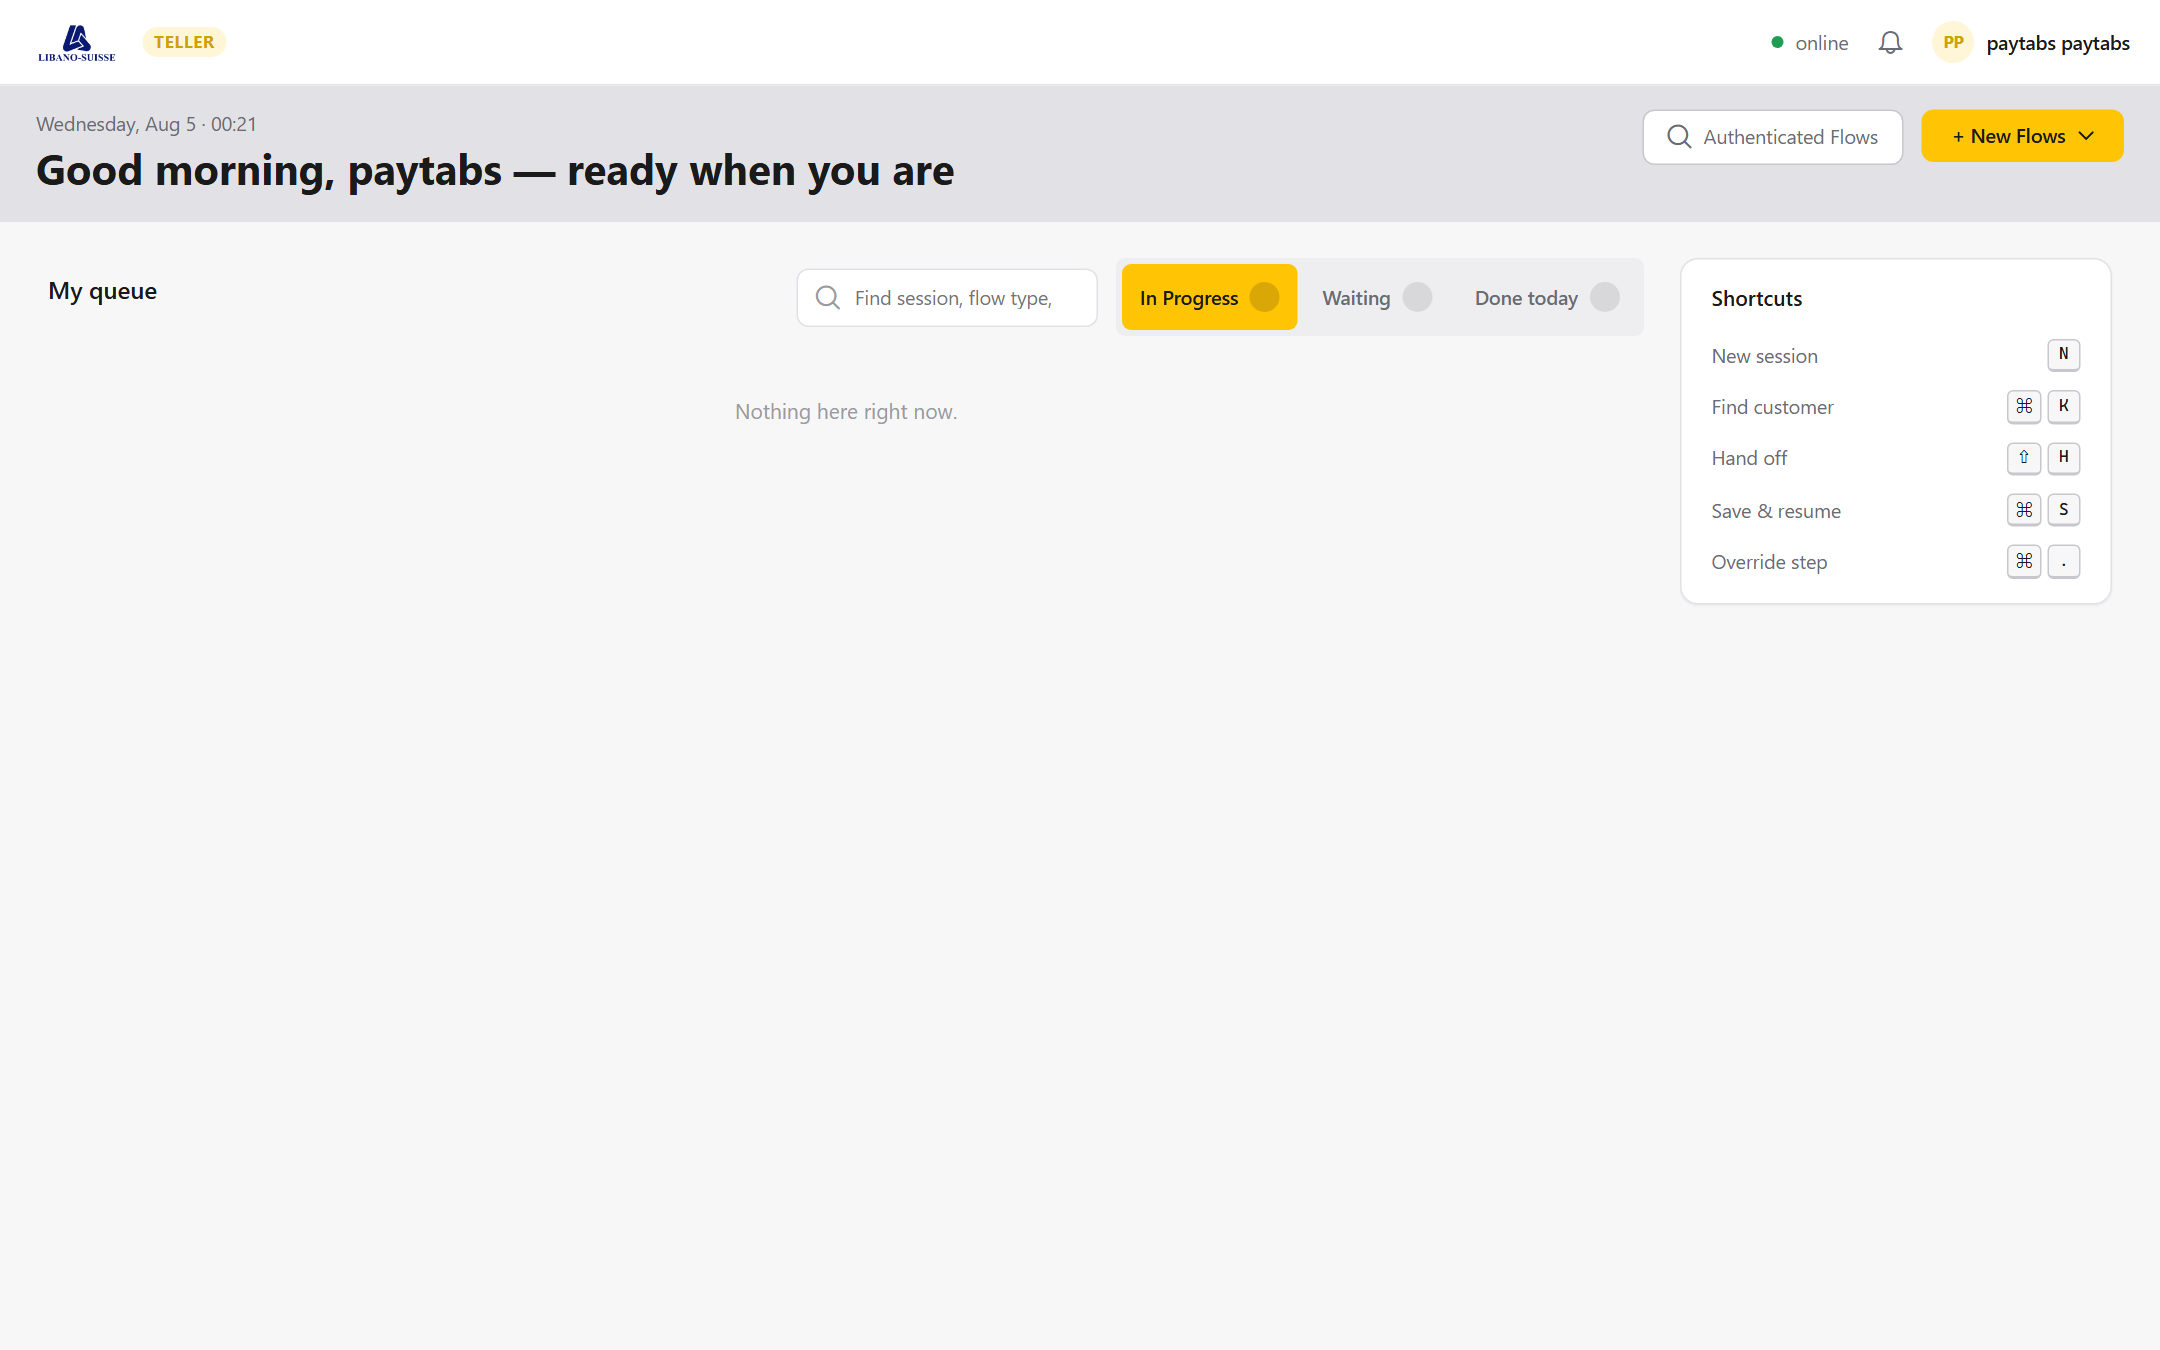
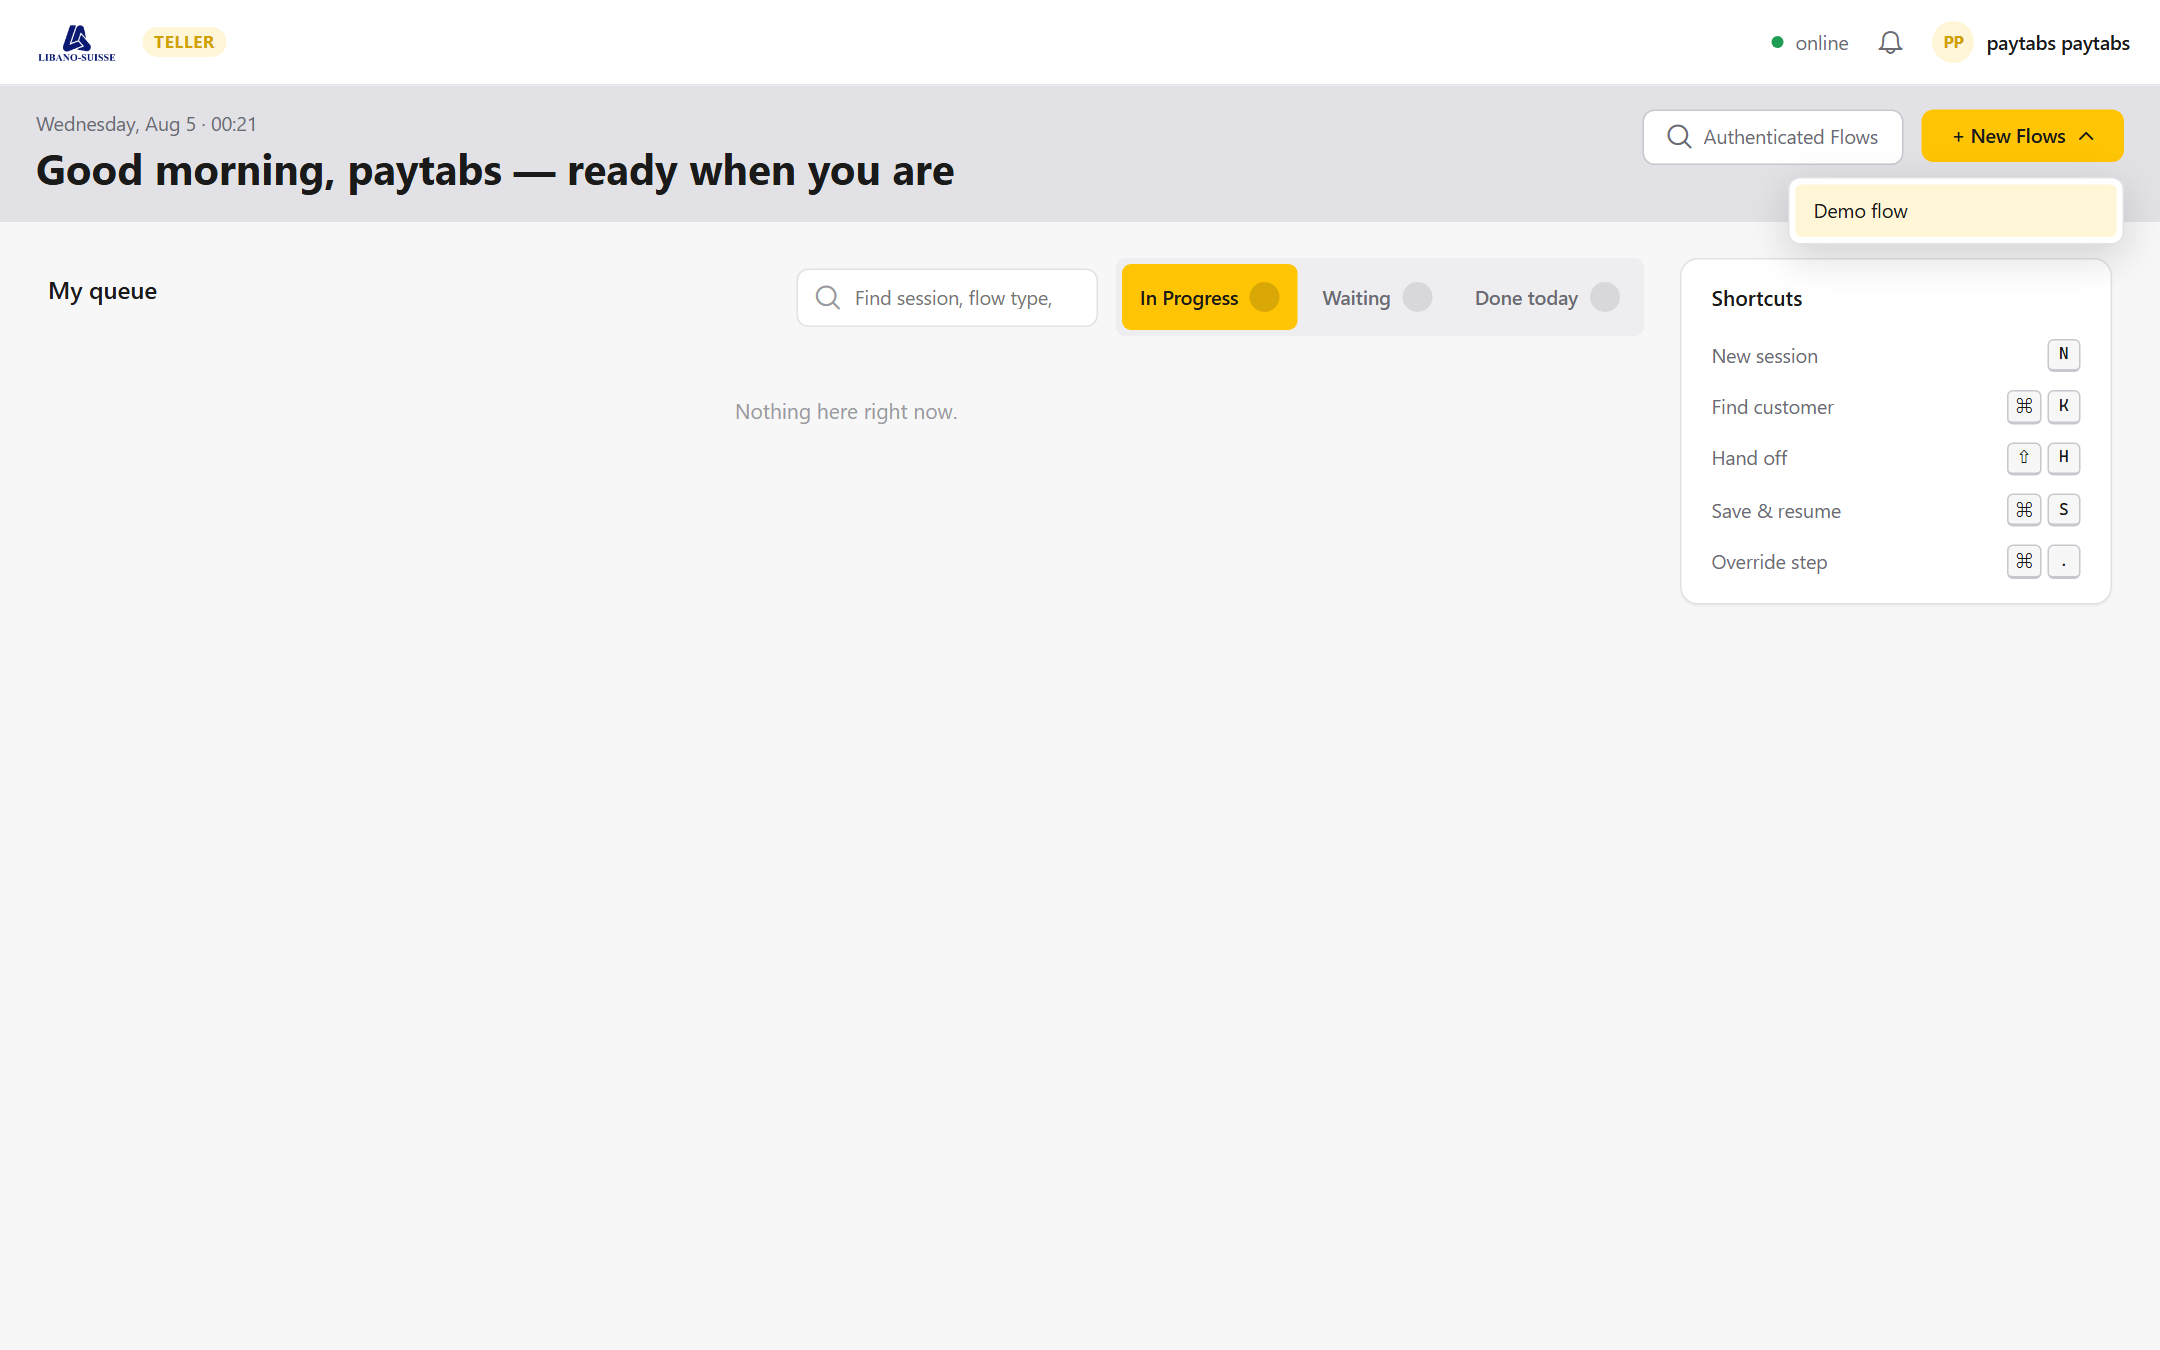
The teller session screen. Selecting a flow opens the engagement optimized for the counter. The layout manager arranges the same Engagement Block the client would see into a dense, single-view work surface. Each step is titled (for example Teller Page 1), and capture panels sit side by side rather than one screen at a time.
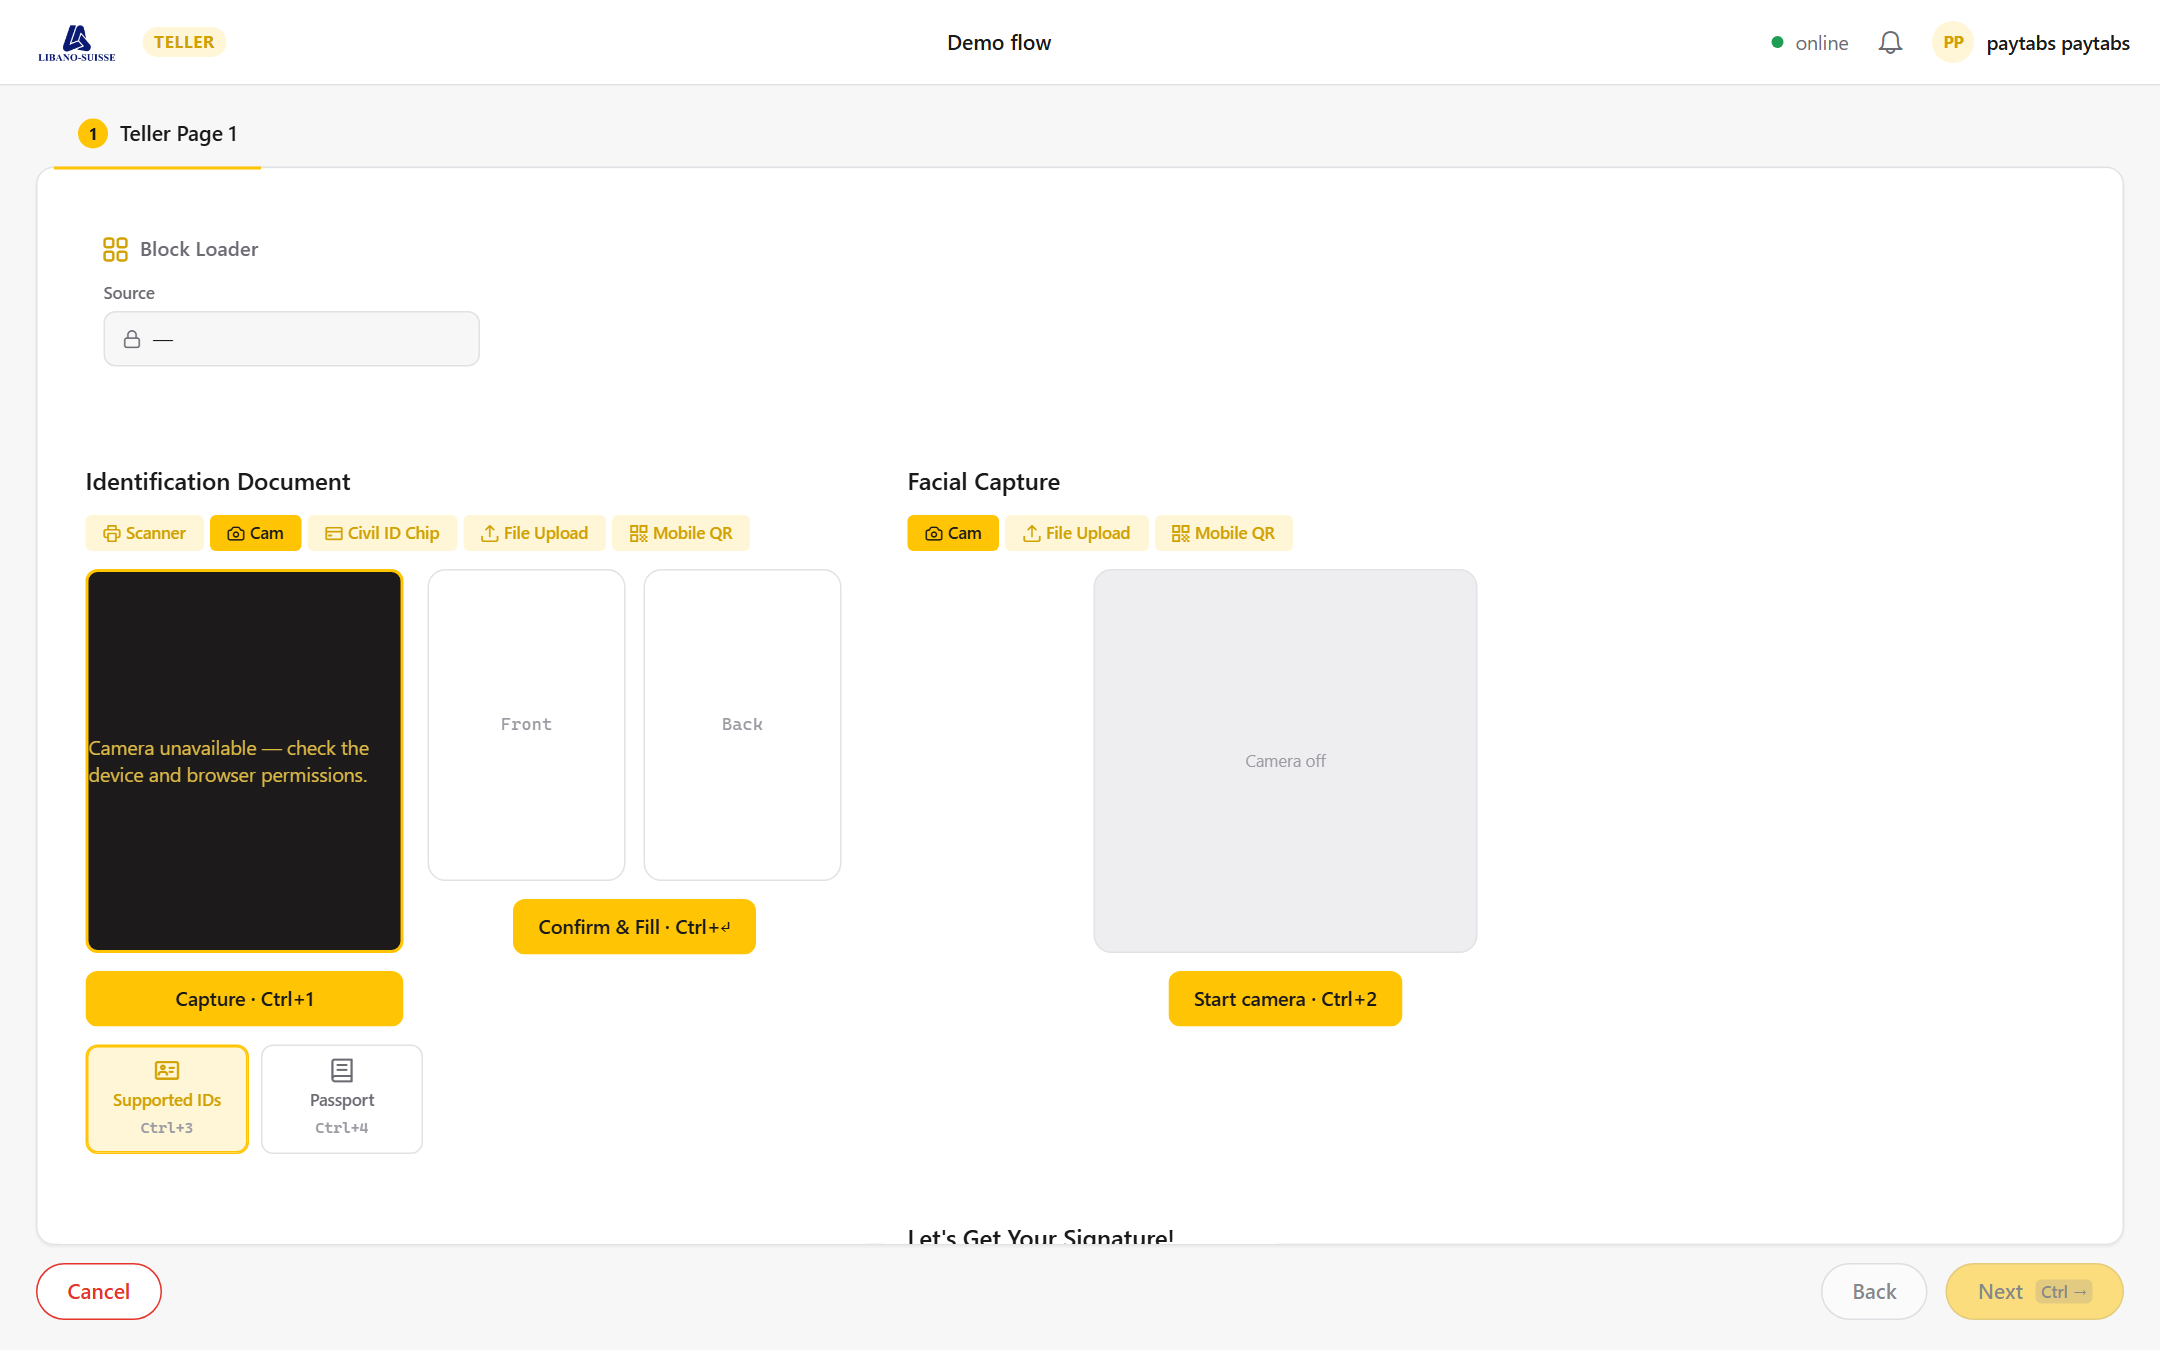
Every capture step gives the agent more than one source, so the counter is never blocked by one device:
- Identification Document. Choose Scanner, Cam, Civil ID Chip (read the chip directly), File Upload, or Mobile QR (hand the capture to the client's phone by scanning a code). Front and back slots, Capture (Ctrl+1), then Confirm and Fill (Ctrl+Enter) to push the read data into the form. Supported IDs (Ctrl+3) and Passport (Ctrl+4) switch the document type.
- Facial Capture. Choose Cam, File Upload, or Mobile QR, with Start camera (Ctrl+2).
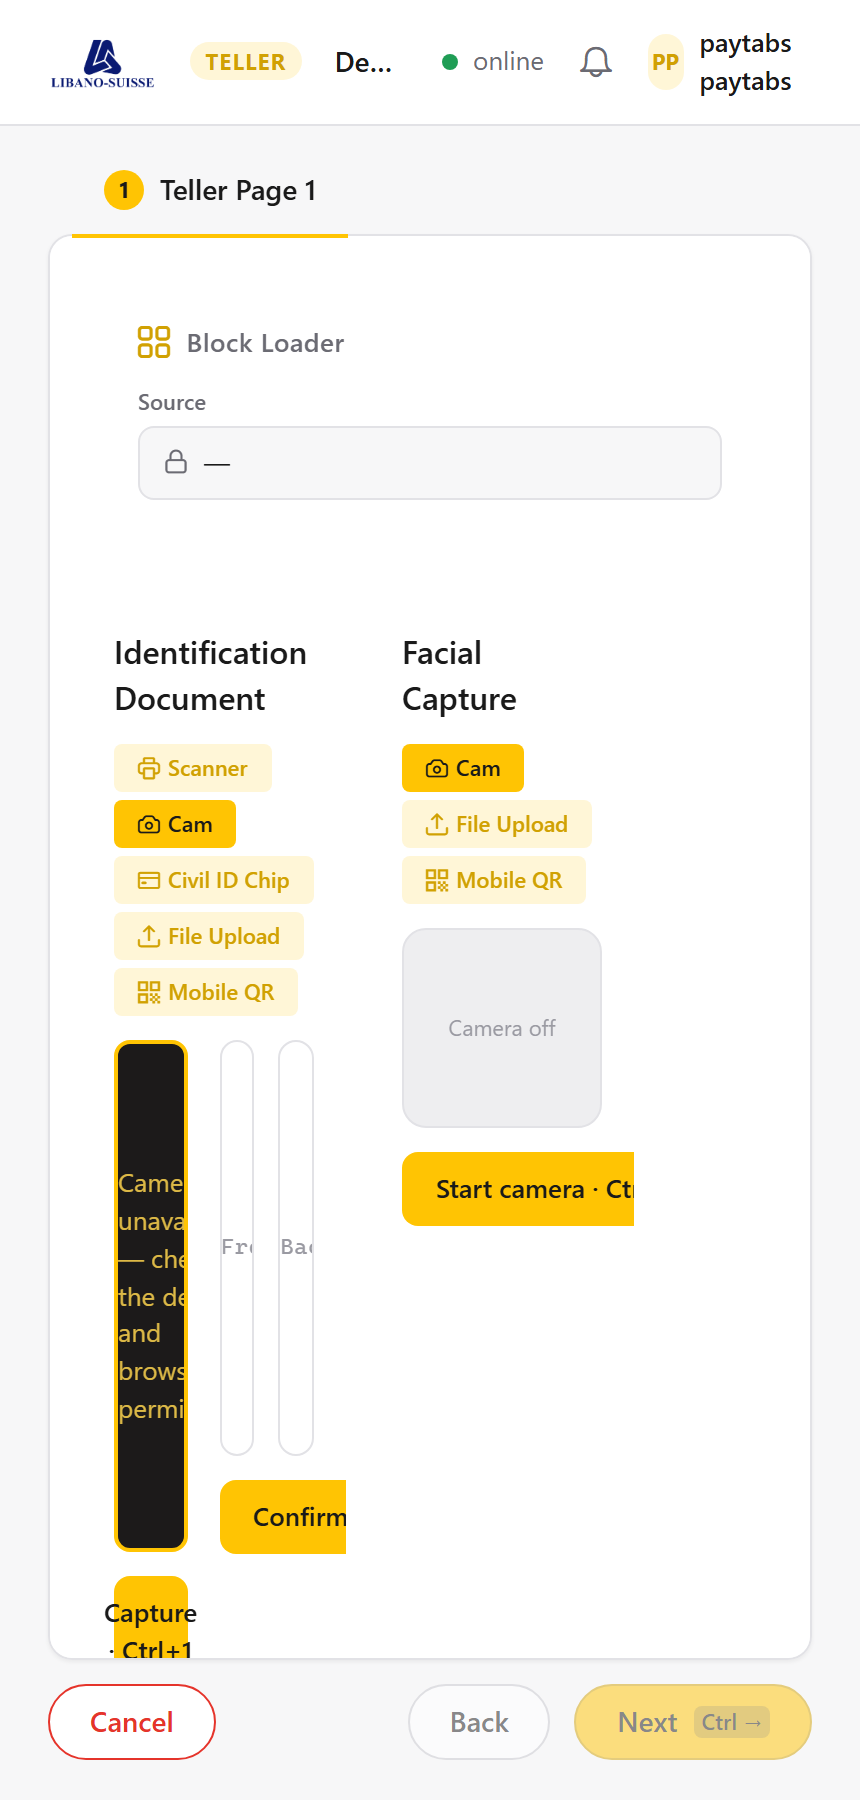
The teller portal is built for the counter first, so the desktop layout is where an agent is fastest: wide, side-by-side capture panels and keyboard shortcuts. It is also fully responsive, so the same session runs on a tablet carried to the client or on a phone. On narrow screens the capture sources stack while the step order stays the same.
Roles and Permissions
The DXP supports custom roles built from claims dragged into a role definition. The recommended starting roles for this audience are below. Your administrator can adjust the claims to match your operating model.
| Role | Recommended access | Typical tasks |
|---|---|---|
| Customer Service Operator | Interactions read and edit, Clients read. | Process the daily queue, reply to clients. |
| Customer Service Manager | All Operator rights, plus Export, Customize View, Reassign. | Run the queue, monitor SLA, handle escalations. |
FAQ and support
I cannot sign in. What do I do first?
Check that the email ends with your work domain. Use Forgot Password to reset. If it still fails, your account may be deactivated; contact your administrator.
The decision buttons are greyed out.
A required pre-processing field is empty, or an AML match has not been cleared. Fill every required field and clear or confirm every red list in the Inline Compliance Hub.
Why is this row yellow?
Yellow Modified is a data modified signal. It means the application carries an is_dirty flag: a value that OCR, transliteration, or translation auto-filled into an Assisted Data Entry field was edited by the client after it was populated. Check the fields with the yellow flag next to them and verify each against the provided identity document.
Why is this row red?
Red IDV means verify the identity of the user. The most common reasons are a low face match, an ID authenticity manual review, or detected tampering. Check the Match Percentage and the captured ID and selfie.
Can I undo a decision?
Not from your account. Contact your manager. The administrator can pull the interaction back in special cases.
I see a red IDV flag on a client profile.
The client ID is about to expire, or KYC is past the renewal window. Follow your tenant procedure, usually a renewal flow sent to the client.