
Administrator guide
Keep the tenant healthy and configured for your organization. This guide covers the three big areas an administrator owns on the Digital Experience Platform (DXP): settings, audits, and Client Profile setup, plus users, roles, AML, and integrations.
Tenant Administrator · IT Lead · Platform OwnerAbout this manual
This manual is written for the people who keep the Assentify DXP healthy and configured for their organization. It covers three big areas: settings, audits, and Client Profile setup. Use it alongside the Assentify Platform Tour, the Assentify User Manual, and the Compliance Hub guide.
Signing in and around the platform
What it is. The way you and every user reach the tenant. Sign in uses a work email that ends in your tenant domain, then an optional two factor code.
- Open the DXP URL provided by your administrator.
- Enter your work email, then press Sign In.
- Enter your password, then press Login.
- If two factor authentication is on, enter the 6 digit code from your authenticator app.
Once signed in, the left side menu shows the full surface: Dashboard, Interactions, Clients, Documents, Flow Builder, Flow Manager, Compliance Hub, Communication, Developers, Logs, Settings. As an administrator you have access to all of them.
The Settings landing page
What it is. Settings on the side menu opens a grid of cards. Each card is one area of tenant configuration. Every card in the table below is documented in this guide.
| Card | What it configures |
|---|---|
| User Management | Roles and users. |
| Email Setup | The tenant SMTP server. |
| System Configuration | Data persistence, time zone, theme, profile types, payment gateway. |
| Billing Management | Subscription, quota, invoices. |
| Client Profile | Verified Person and Verified Business profile configurations. |
| AML Management | Screening Profiles, custom lists, top level toggles. |
| Data Source | REST, Soap, and Data Set connections, plus Webhook and government integrations. |
| Session Management | Session length, idle timeout, and password policy. |
| RTRA Engine Configuration | The Real Time Transaction Risk Assessment engine and rules. It requires an active RTRA subscription and setup, so it may not be present on every tenant. |
| RF1 BDL Circular | Toggles Turn on RF1 BDL Circular Reporting for regulatory reporting to the Banque du Liban RF1 circular, and reveals reporting config when on. |
Audits and logs
What it is. Logs on the side menu shows the platform wide audit. Every row is one recorded event across the tenant.
| Column | Meaning |
|---|---|
| Created | The timestamp of the event, in the tenant time zone. |
| Activity Type | The kind of event, for example a setting change or a webhook call. |
| User Name | The user or system actor that triggered the event. |
| Message | A short summary of what happened. |
- Open Logs from the side menu.
- Press the + icon on a row to expand it for the full payload.
- Filter the table to the rows you need.
- Press Export at the top right to download the filtered view.
User Management
What it is. Roles are built from claims. A claim is the right to view or act on one part of the platform. Drag a whole module or specific claims into a role, then assign the role to a user.
Manage Roles, step by step
- Open Settings > User Management.
- Press Manage Roles.
- Press the + to create a new role, or pick a role to edit.
- Set the Role Name.
- Drag components or specific claims from the library into the role.
- Press Save.
Block Access: how custom flows become runnable
Granting a role's Associate Permissions is not enough to open a custom flow. Manage Roles has a Block Access section that lists every flow by UUID as checkboxes. The Administrator role alone carries every permission except per flow block access.
- Open Manage Roles and pick a non-admin role, for example ALL ROLES.
- Scroll past the Associate Permissions cards to the Block Access section.
- Check the flow you want to grant, then press Save.
- Open the user and associate that role alongside Administrator.
Adding a user
- Enter First Name and Last Name.
- Enter the user's Email.
- Enter the Date of Birth. This field is required.
- Assign one or more Roles.
- Optionally add a Picture, Phone Number, and Department.
- Press Save to create the user.
Roles and permissions
The DXP supports custom roles built from claims dragged into a role definition. The recommended starting roles for this audience are listed below. Your administrator can adjust the claims to match your operating model.
| Role | Recommended access | Typical tasks |
|---|---|---|
| Tenant Administrator | Full claims across User Management, Settings, Logs. | Owns users, roles, settings, integrations, security. |
| IT Lead | User Management, Email Setup, Data Source, Developers, Logs. | Owns integrations, SMTP, API keys. |
| Platform Owner | Read across everything, write on Settings and Email Setup. | Owns the vendor relationship and roadmap with Assentify. |
Client Profile setup
What it is. The configuration behind each client's profile page. Two tabs sit at the top: Verified Person and Verified Business. Each profile type is configured separately.
- Open Settings > Client Profile.
- Choose the Verified Person or Verified Business tab.
- Set Client Title and Client Subtitle, the header on the client profile page.
- Set the Show toggles for KYC Documents, Captured Documents, Signed Documents, and Interactions Table.
- Set Run AML Screening Every X Days. The default is 3.
- Set Alert Time Before KYC Expiry in days. The default is 30.
- Set Alert Time Before KYC Renewal in days. The default is 1000.
- Use Import to bulk import client profiles from a CSV.
- Use Configure Client Profile to add custom data points and map them to flow outputs.
- Press Save.
Configure Client Profile: mapping flow data onto the record
Configure Client Profile opens Map Profile Sources, the Clients Table Configuration. It maps Data Points Available For All Created Flows onto the client record fields Client Profile Data 1..N. Each mapped field shows its flow source, for example Demo flow > Engagement > Assisted Data Entry > Email. Each field also has two toggles, Is Displayed On Table and Is Filterable. Client Profile Data 1 is Client ID and is locked. This is the bridge between what a flow captures and what appears and is filterable in the Clients module.
| Field | Default | What it drives |
|---|---|---|
| Run AML Screening Every X Days | 3 | Rescreen cadence. The usable interval depends on client count. Contact Assentify for a different interval or an upgrade. |
| Alert Time Before KYC Expiry | 30 | Drives the yellow KYC flag. |
| Alert Time Before KYC Renewal | 1000 | Drives the renewal sweep. |
Define Client Uniqueness
What it is. The rule set that stops duplicate clients. It sits on the right side of the Client Profile page. The platform refuses to create duplicate clients across these dimensions.
- Confirm Use biometric face encoding for uniqueness is on. It is on by default.
- Add additional unique elements with the Search Column Name field, for example phone number or national ID.
- Press Save to apply the uniqueness rules.
The Assign Client Profile Elements that must be Unique multi-select complements the biometric face encoding toggle. The elements you can mark unique are Client ID, Email, Phone Number, Birth Date, Name, Profile Picture, Time started, and Time Ended.
Risk Based Approach
What it is. Risk Based Approach is on by default. Risk Levels show as colored badges (Low, Medium, High). The 0 to 10 strip below the badges shows the thresholds with sliders. The RBA Score column on Client Clear uses these tiers.
- Add tiers with the + icon next to the risk badges.
- Drag the slider to set the threshold between Low and Medium. The sandbox default is 3.00.
- Drag the slider to set the threshold between Medium and High. The sandbox default is 8.00.
- Press Save.
| Threshold | Sandbox default |
|---|---|
| Between Low and Medium | 3.00 |
| Between Medium and High | 8.00 |
Configure Risk Profile
Configure Risk Profile opens Clients Risk Scoring Configuration. You pick data points from Data Points Available For All Created Flows and build a Clients Risk Score Structure by assigning Weights to rules, with a running Total Weights.
Each rule sets a Risk Behaviour. Contributes to Risk Score adds the rule's weight, and the summed total maps to a Low, Medium, or High band. Auto Classify on Value sets the risk level directly and overrides the score, for hard rules like a sanctioned country. Values Classification Mapping maps each possible value to a weight or a target level. See the Compliance guide for the full walkthrough.
AML Management
What it is. The tenant wide AML controls, custom lists, and the Screening Profile that decides which algorithms run and how they are weighted.
- Set Perform Background Check On All Clients at the top of the page.
- Set Flag Client Application On AML Match.
- Use Add New List to add a custom list. Each custom list shows as a pill with a + icon.
- Tune the Screening Profile weights described below.
- Press Save.
The 40 percent bucket splits across four matchers, each with its own percentage: Leverage Double Metaphone, Leverage Soundex, Leverage Skeleton, and Leverage Phonetics. These catch phonetic and spelling drift.
The AI group carries Perform Agentic AI Variations, Apply Transliteration, and Fuzzy Matching. These catch cultural and geographic name variants, typos, and script differences.
System Configuration
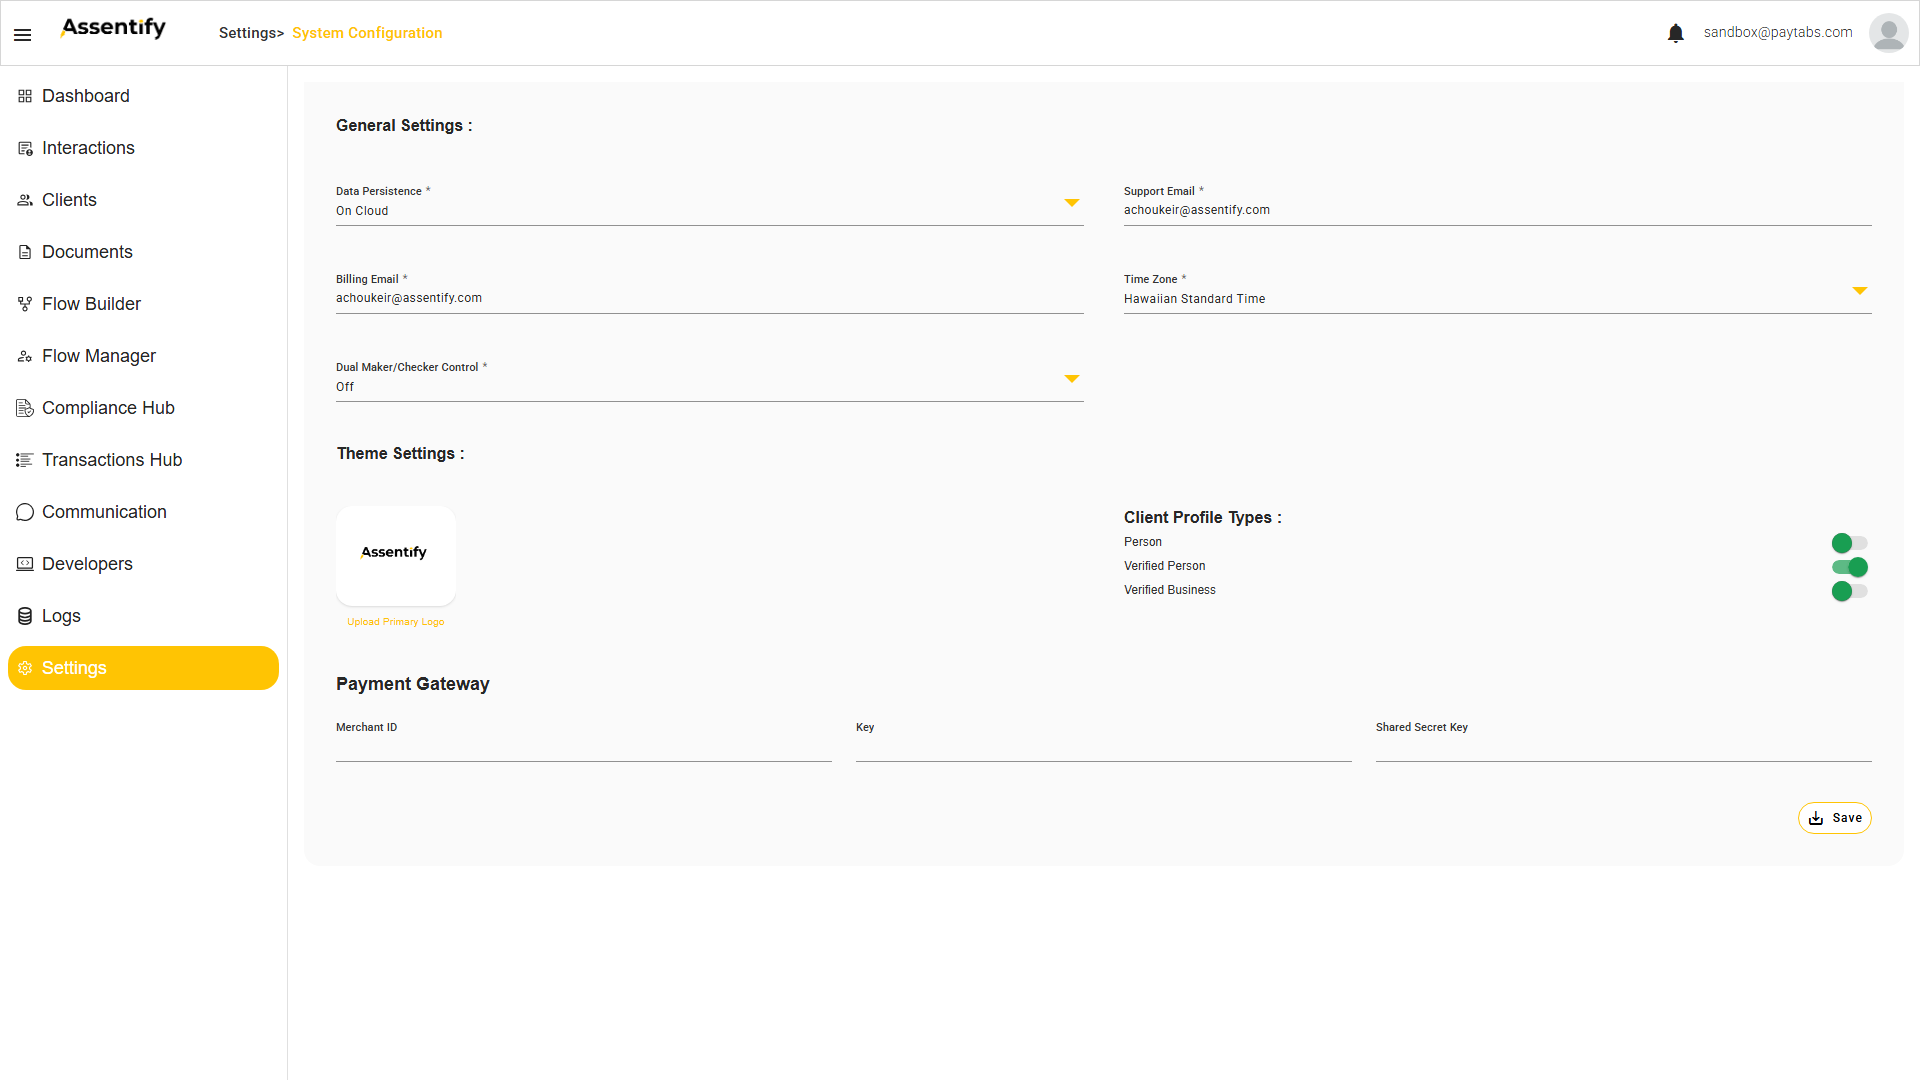
| Setting | What it controls |
|---|---|
| Data Persistence | On Cloud or On Premise. On Premise requires a proxy address and a deployment at your data center. |
| Support Email | The address that receives platform support cases. |
| Billing Email | The address that receives monthly invoices. |
| Time Zone | The tenant time zone used everywhere times are displayed. |
| Dual Maker / Checker Control | Two approver workflow for settings and flow changes. |
| Theme Settings | Upload Primary Logo for the platform theme. |
| Client Profile Types | Person, Verified Person, Verified Business toggles. |
| Payment Gateway | The tenant payment gateway credentials: Merchant ID, Key, and Shared Secret Key. |
- Choose Data Persistence: On Cloud, or On Premise with a proxy address.
- Set Support Email and Billing Email.
- Set the Time Zone for the tenant.
- Turn on Dual Maker / Checker Control if you want two approver control on settings and flow changes.
- In Theme Settings, use Upload Primary Logo to set your brand logo.
- Set the Client Profile Types toggles for Person, Verified Person, and Verified Business.
- In Payment Gateway, enter the Merchant ID, Key, and Shared Secret Key for the tenant payment gateway.
- Press Save.
Email Setup
What it is. The SMTP server the tenant uses for all flow notifications. Once set, emails appear to come from your domain, not Assentify.
- Enter the SMTP Mail Server.
- Enter the User Name.
- Enter the SMTP Port Number.
- Enter the account password.
- Enter the Sender Email.
- Toggle SSL Required and Authentication Required as needed.
- Press Save.
Session Management
What it is. The session length and password policy for every user in the tenant.
- Set the Session length in minutes. The default is 15.
- Set the Idle timeout (minutes) to log a user out after inactivity, separate from total session length.
- Set the Password Policy toggles: Require Digit, Require Lowercase, Require Uppercase, and Require Non-Alphanumeric.
- Set Required length. The default is 9.
- Set Required Unique Chars. The default is 1.
- Press Save.
| Setting | Default |
|---|---|
| Session length (minutes) | 15 |
| Idle timeout (minutes) | Inactivity logout, set separately from session length. |
| Required length | 9 |
| Required Unique Chars | 1 |
Data Source
What it is. Connections to your own systems. Each data source is a card with a pencil to edit and a + icon to add. Each source holds endpoints (Pull Data Request, Push Data Request, JSON File) with headers, body, and optional XSLT transformation. The card level source types are Data Source, Webhook, and Integration Government.
- Press the + icon to add a source.
- Enter the source name.
- Choose the Data Source Type: REST, Soap, or Data Set.
- Choose the auth: API Key or Basic Auth.
- Enter the URL and credentials.
- Press Test.
- Press Save.
Billing Management
What it is. Your subscription usage and invoice history. The top shows an Interactions chart by Week Of, and a Your Usage card with Total Allowed, Total Consumed, Total Over, and a percent donut. The bottom is the invoice table.
| Invoice column | Meaning |
|---|---|
| Invoice Id | The invoice reference. |
| Month Of | The billing month. |
| Total | Amount due in USD. |
| Interactions | Interactions counted in the period. |
| Status | The payment status of the invoice. |
Security and Sessions
What it is. The security controls that protect every account in the tenant.
| Control | How it works |
|---|---|
| Two factor authentication | Set at tenant level. The platform prompts every new user to set up 2FA on first sign in. |
| Session policy | One active session per user across browsers. Signing in elsewhere ends the first session. |
| Password policy | Configured under Session Management. |
| Account lockout | Automatic after a configured number of failed attempts. |
| Audit | Every change to security settings goes to the Logs section. |
Tenant Hygiene
Keep the tenant clean with a regular cadence of reviews.
| Cadence | Task |
|---|---|
| Quarterly | User review. Audit the user list and deactivate anyone who has left the team. |
| Quarterly | Role review. Claims drift over time. |
| Monthly | List refresh check. The Compliance Hub Status sub-module shows last update per list. |
| Monthly | Billing review. Track quota burn. |
| Yearly | Key rotation. Rotate API keys and webhook secrets annually. |
Route platform issues through your administrator
For platform issues, configuration help, or feature requests, contact your administrator first. The administrator has visibility into your tenant configuration and routes platform level cases to Assentify Customer Success. Raise internal tickets with your IT or Operations team. The Assentify support email is support@assentify.com, filed through your administrator.
FAQ and troubleshooting
Check the user is active. Check the email ends in the tenant domain. Reset the password. If 2FA was lost with a phone, clear MFA so the user re-enrolls.
Open the interaction in History view. If your role has Retrieve rights, press Retrieve. Otherwise raise a ticket with Customer Success.
Yes. Claims travel with the role record, not the name. Renames are captured in the audit.
Open Logs, filter by webhook. The response body and HTTP status are recorded.
Schedule a deployment with Customer Success. Plan downtime for cutover.
Yes. The log is append only at the platform layer. For higher assurance, export regularly to your SIEM.
Yes for Enterprise tenants. Ask Customer Success for the bulk import template.
Raise a request with Customer Success. Domain allow lists are tenant level and not self serve.