
Compliance Officer Guide
Screen every applicant and client against sanctions and PEP lists, decide what each match means, monitor live transactions, and evidence every decision you take inside the Compliance Hub.
Compliance Hub · RTRA · Risk Based ApproachThis guide is written for compliance officers, heads of compliance, and money laundering reporting officers who use the Digital Experience Platform (DXP) to screen applicants, clear flagged clients, monitor live transactions, and evidence the decisions they take.
About this guide
You screen applicants and existing clients, clear the ones the engine flags, monitor live transactions, and keep an audit trail regulators can read. Three surfaces carry most of your work.
Compliance Hub
Screen and adjudicate. Holds Workspace, Client Clear, Audit Hub, and Status.
Settings, AML Management
Tune the Screening Profile, weights, lists, and the two global toggles.
Settings, Client Profile
Set the Risk Based Approach and the re-screening schedule per profile type.
The two-part Compliance Engine
The Compliance Engine has two main parts that run against different moments in a client's life.
Runs on every new application and on every existing client on a schedule. It compares a person or business against the AML, sanctions, and PEP lists.
Runs against ongoing client transactions after onboarding. Rules fire when a live transaction breaches a condition you set.
Both parts surface inside the Compliance Hub and inside the inline review you see on flagged interactions.
Signing in and around the platform
- Open the DXP URL provided by your administrator.
- Enter your work email, then press Sign In.
- Enter your password, then press Login.
- If two factor authentication is on, enter the 6 digit code from your authenticator app.
You can only sign in with a work email that ends in your tenant domain. Once signed in, the left side menu shows Dashboard, Interactions, Clients, Compliance Hub, and Logs. As a compliance officer you will mostly use Interactions, Clients, and Compliance Hub.
Inline review on a flagged interaction
When an application is flagged for AML, the Inline Compliance Hub appears inside the expanded row in the compliance Backend Block step. Open the row from your Interactions queue.
- Open Interactions and expand the flagged row.
- Read every list searched. A green check means no match on that list. A red triangle means at least one possible match.
- Open a list that shows a match. The panel reveals the matched record.
- Read the matched record fields: source name, aliases, source list metadata, country, date of birth where present, and a match score from the AI engine.
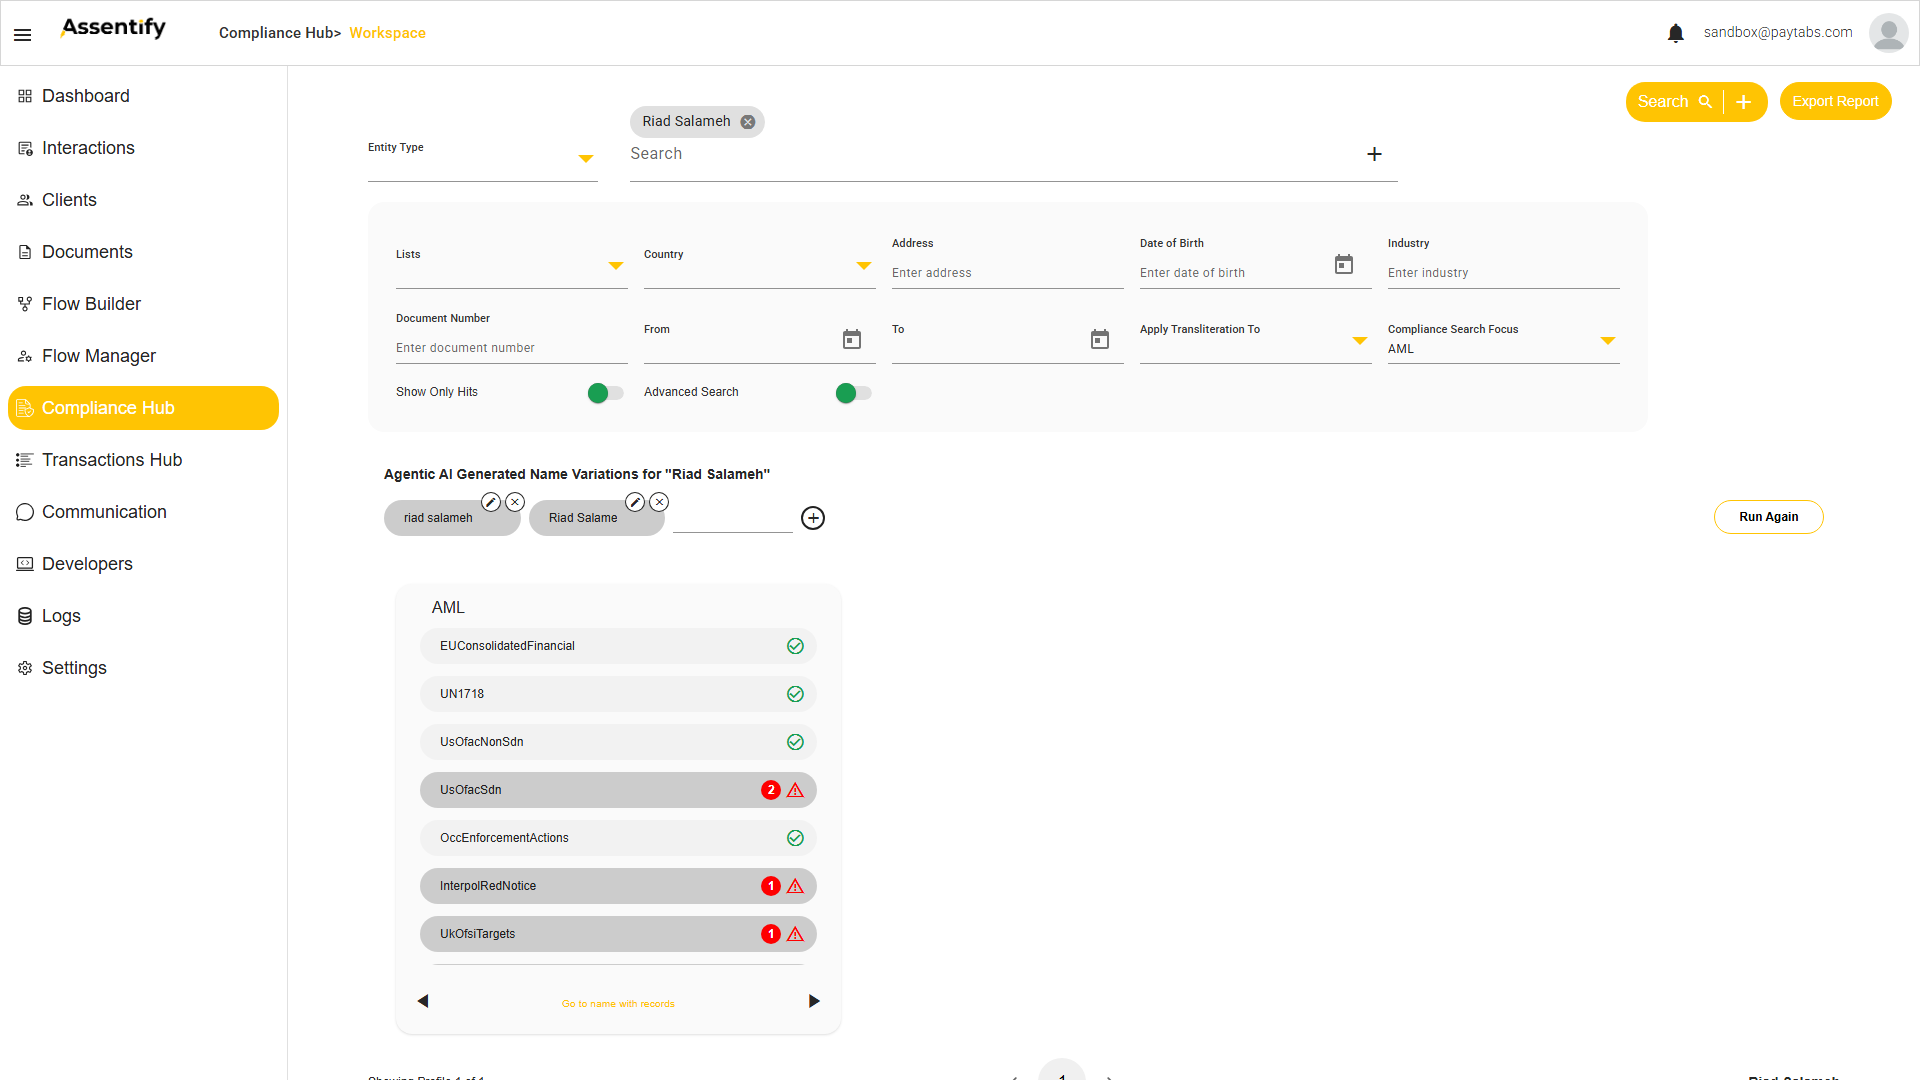
Pill view and table view
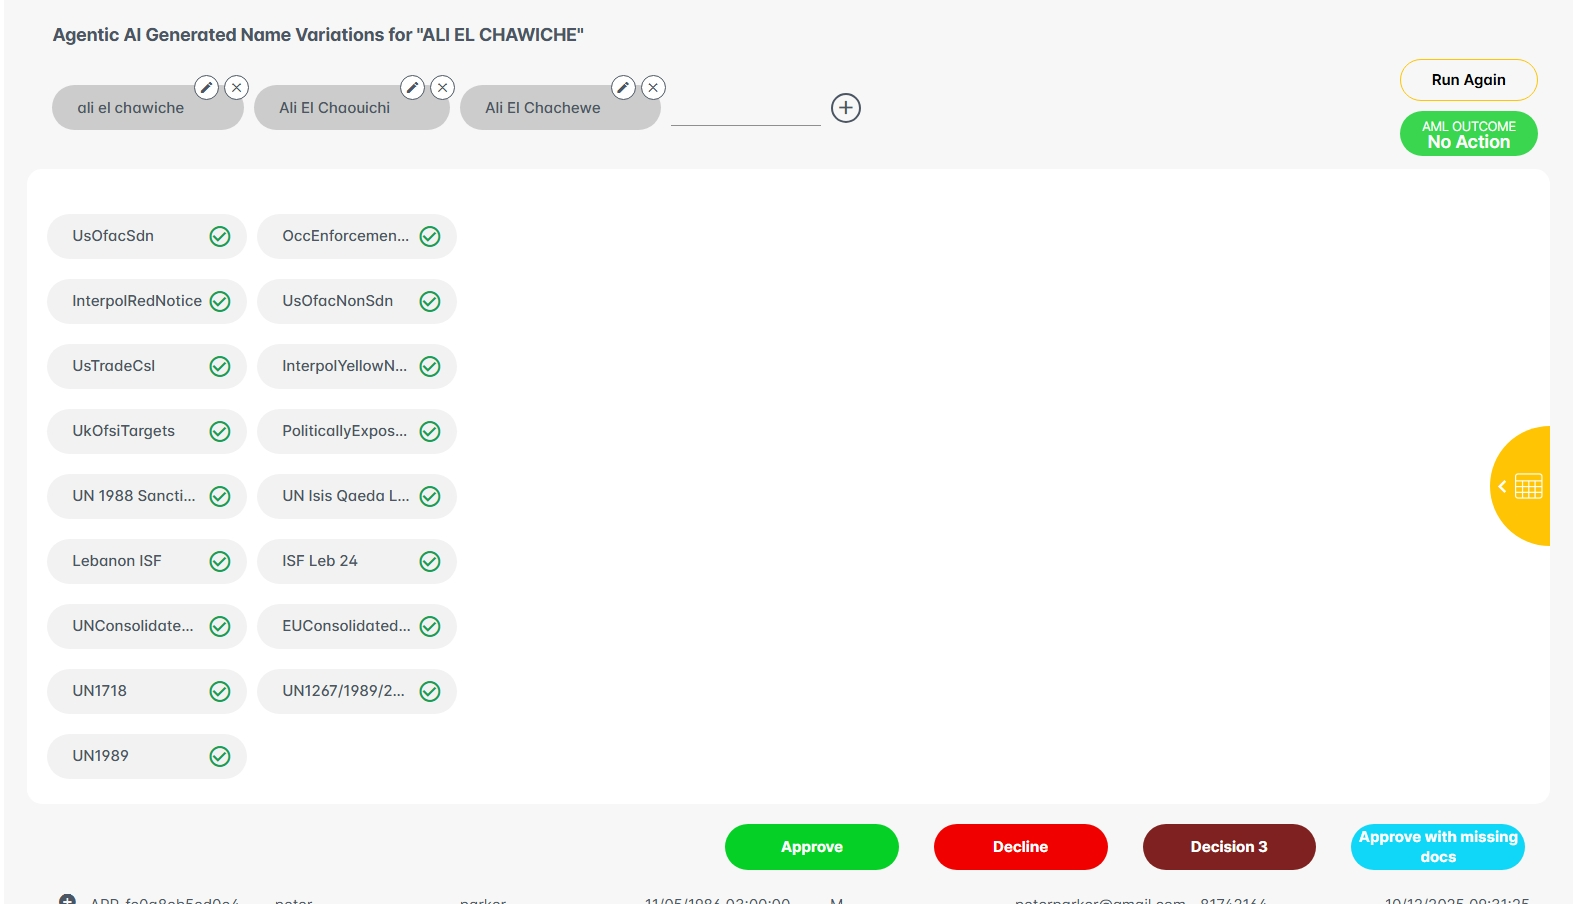
The inline screening has two layouts. Toggle between them with the gold tab on the right edge of the panel.
Pill view
The default. Every list appears as a pill with a green check when clean or a red mark when it has a possible match. It is the fastest read for a single interaction: scan the pills, open the ones with a match, and decide.
Table view
Switches the matches into a table with Name, Schema, Alias, Score, Country, Address, and Actions, plus Filters for Schema and Country and a search. A checkbox on each row lets you select many matches and action them together, which is how you make bulk AML decisions.
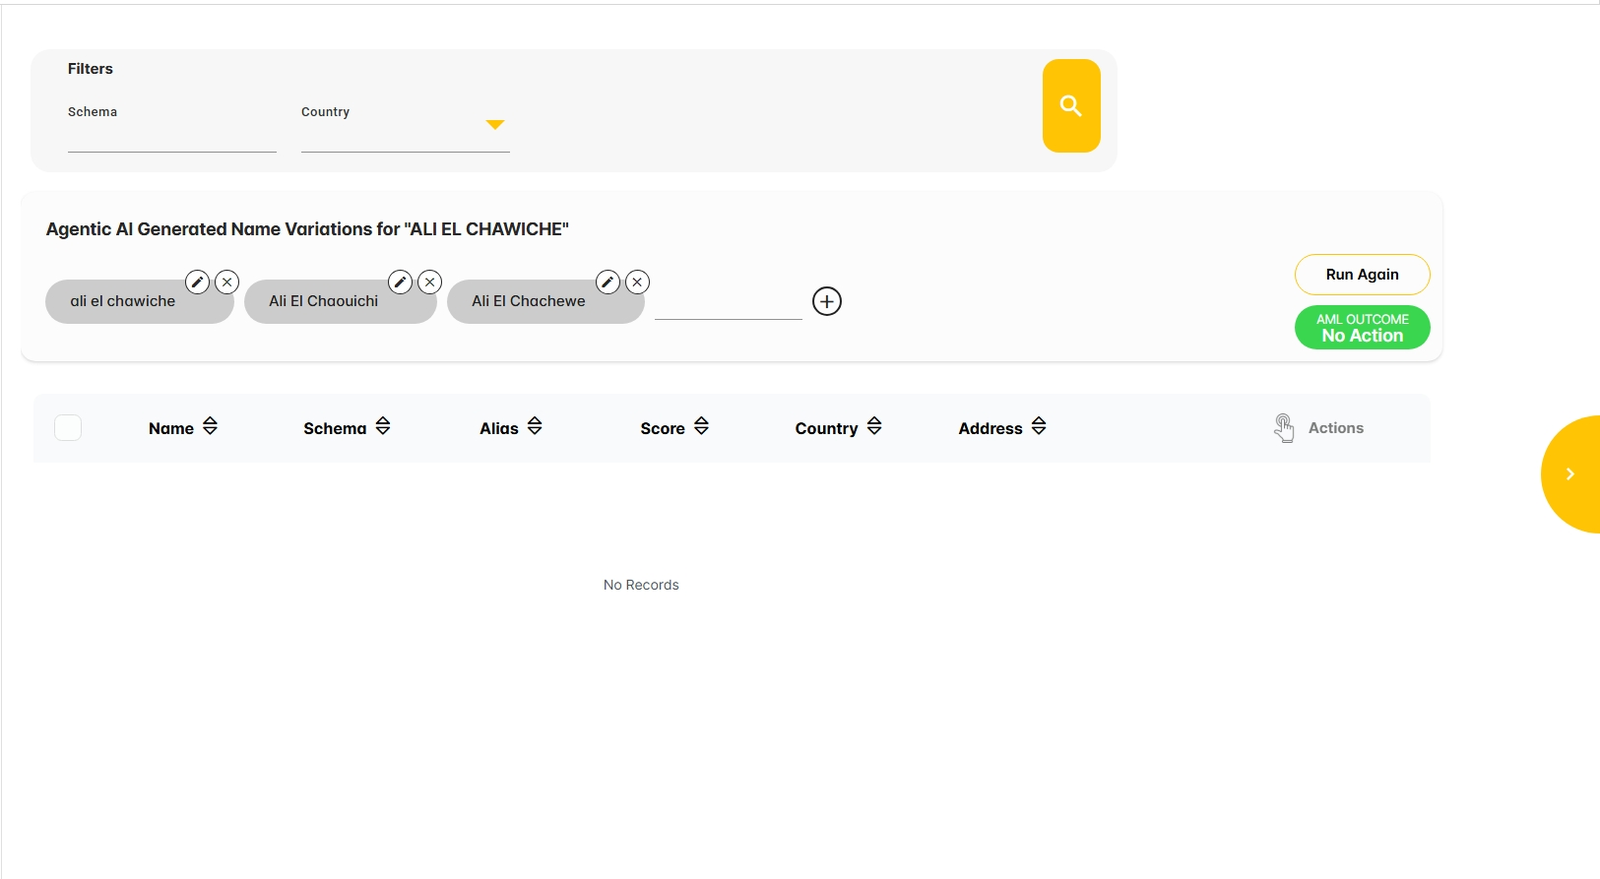
- Press the gold table tab on the right edge to switch to table view.
- Use the Filters (Schema, Country) and search to narrow the matches.
- Sort by any column, for example Score, to work the strongest matches first.
- Tick the checkbox on each row you want, then apply the action to all selected at once.
- Press the tab again to return to pill view.
Actions on a match
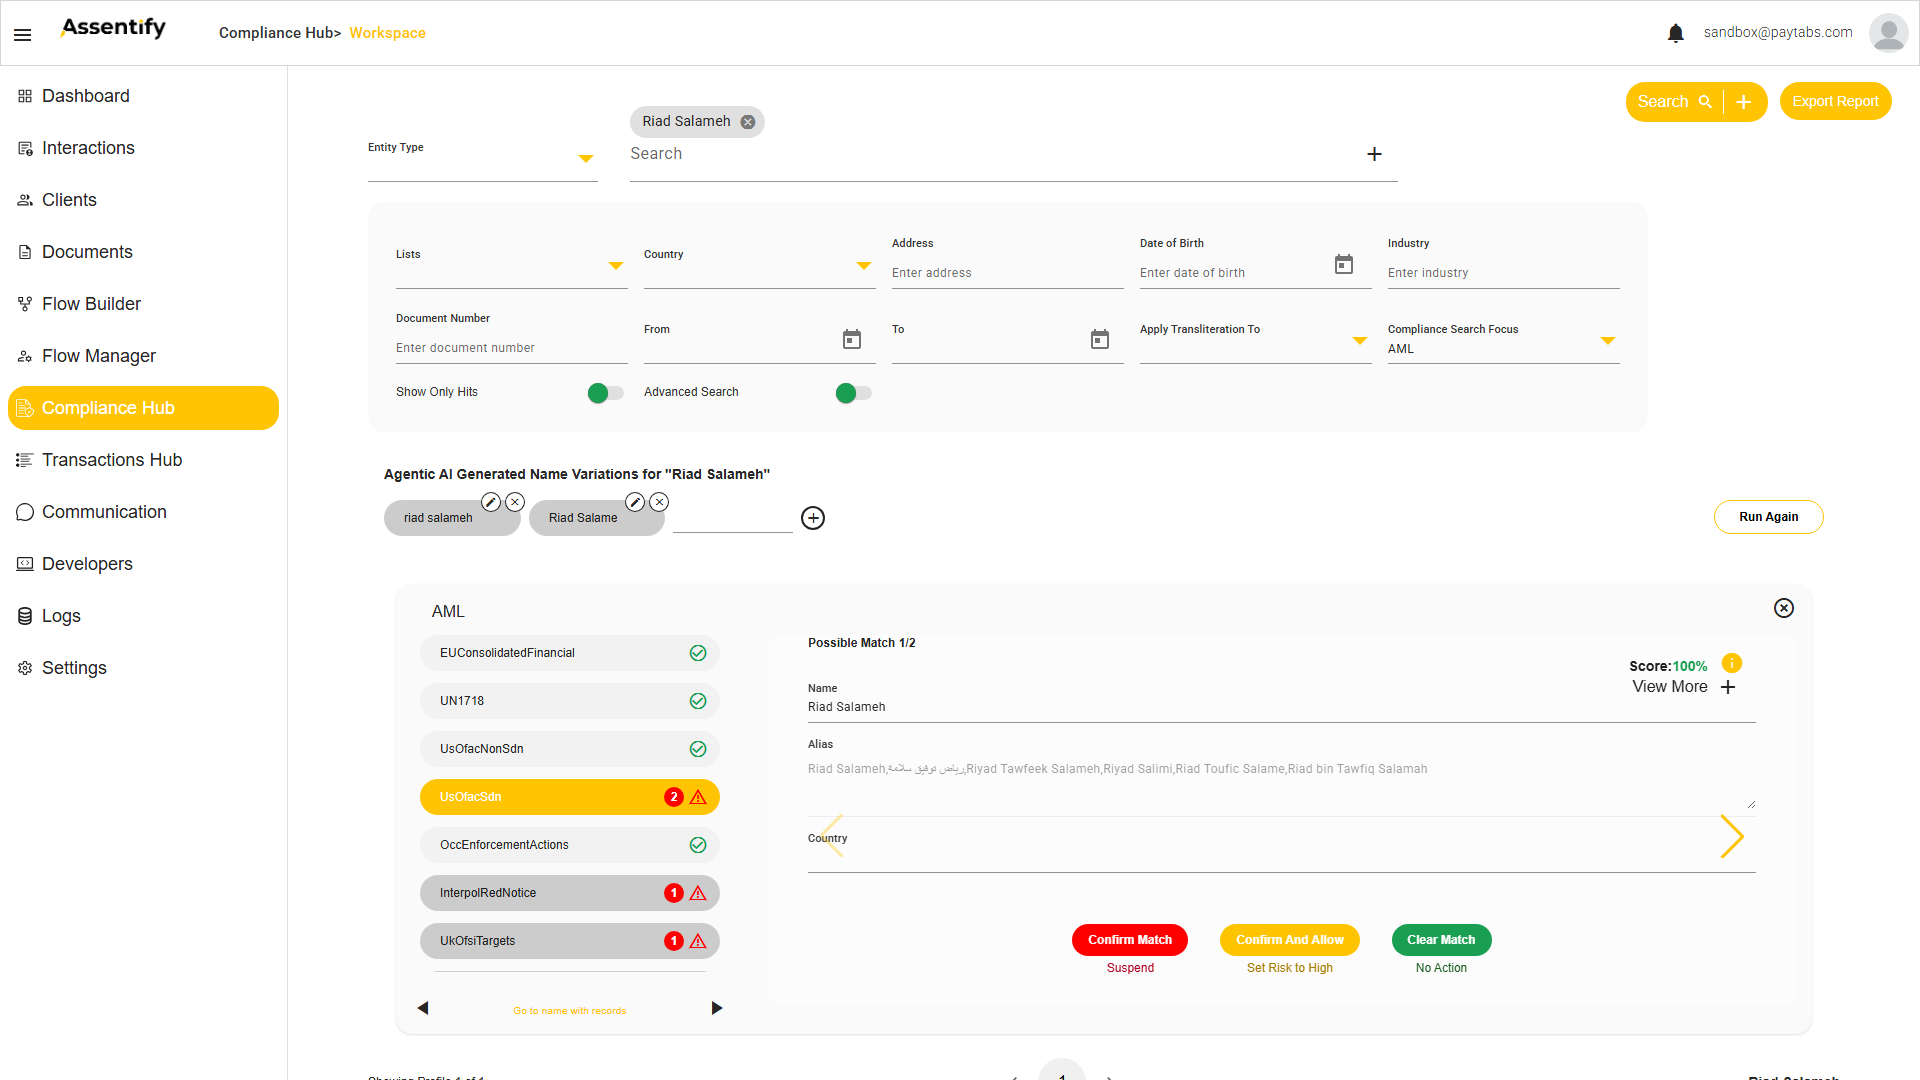
Click a list that has matches (for example UsOfacSdn) to open the matched record. The record shows the possible match with its score, the name, the full alias list, and the country. Page through matches, then choose one action.
| Action | Meaning | Effect on client |
|---|---|---|
| Confirm Match | The list record is the same person or entity. | Maps to Suspend. The client is suspended and the interaction is blocked. |
| Confirm and Allow | Same person, the business absorbs the risk. | Maps to Set Risk to High. Interaction proceeds. |
| Clear Match | Different person or entity, a false positive. | Maps to No Action. Match dismissed. Interaction can proceed once every red list is cleared. |
The biometric panel above the lists
Above the lists in the expanded row sits the biometric panel. It gives you context for the adjudication.
| Field | What it shows |
|---|---|
| Captured selfie | The live selfie the client captured. |
| Captured ID document image | The document image the client submitted. |
| Match Percentage | How closely the selfie matches the document face. |
| Device name, user agent | The device and browser used for the capture. |
| Time started, time ended | The capture window for the interaction. |
Use these together with the list result. A confirmed sanctions match with a high biometric match is a clear stop. A possible match with a poor biometric match is a candidate for additional review.
Compliance Hub Workspace, ad hoc search
Workspace is the standalone surface. Use it for ad hoc searches, bulk file based searches, and reportable sessions outside of any incoming interaction.
- Open Compliance Hub. You land on the Workspace.
- Set Entity Type to person or business.
- Type the name in the Search box, then press Enter to turn it into a pill. This commit step is required. Pressing Search without committing the pill returns nothing. Add more pills to screen several names at once, or use the plus by the box.
- Open Filters and narrow by Lists, Country, Address, Date of Birth, Industry, Document Number, and From / To dates.
- Set Apply Transliteration To for switching between Arabic and Latin script handling.
- Set the Compliance Search Focus. The default is AML. Switch it to PEP to surface politically exposed person results.
- Turn on Show Only Hits to hide green check lists from the result.
- Turn on Advanced Search for a wider net that uses more name combinations. It is slower.
- Press the search control to run the session.
- Press Export Report to download the full session for audit and regulator submission.
Client Clear, the continuous screening queue
Client Clear shows every existing client that the background screening engine has flagged since their last clear. The platform reruns screening on the Run AML Check cadence, configured in Settings, Client Profile, per profile type. The page has tabs at the top for each Client Profile Type, Person, Verified Person, and Verified Business, each with a count badge.
| Column | What it shows |
|---|---|
| Client ID | The internal client identifier. |
| Face | A thumbnail for quick recognition. |
| Name | The primary name. |
| Risk Level | Low, Medium, High, or any custom tier you configured. |
| RBA Score | The numeric Risk Based Approach score from the engine. |
| Client Status | Active, inactive, or suspended. |
| Last Cleared, Last Match | The dates that drive how aged the case is. |
| History | Opens the full action history for this client. |
Working a flagged client, step by step
- Open Client Clear. Pick the tab for the affected profile type.
- Sort by Last Match, newest first.
- Open the client. The biometric panel and the Inline Compliance Hub appear inside the profile.
- Press View More on each match to read the full record.
- Choose Confirm Match, Confirm and Allow, or Clear Match. Add a note for the audit trail.
- If confirmed, follow your institution's suspension or enhanced due diligence procedure.
Screening Profile and algorithm weights
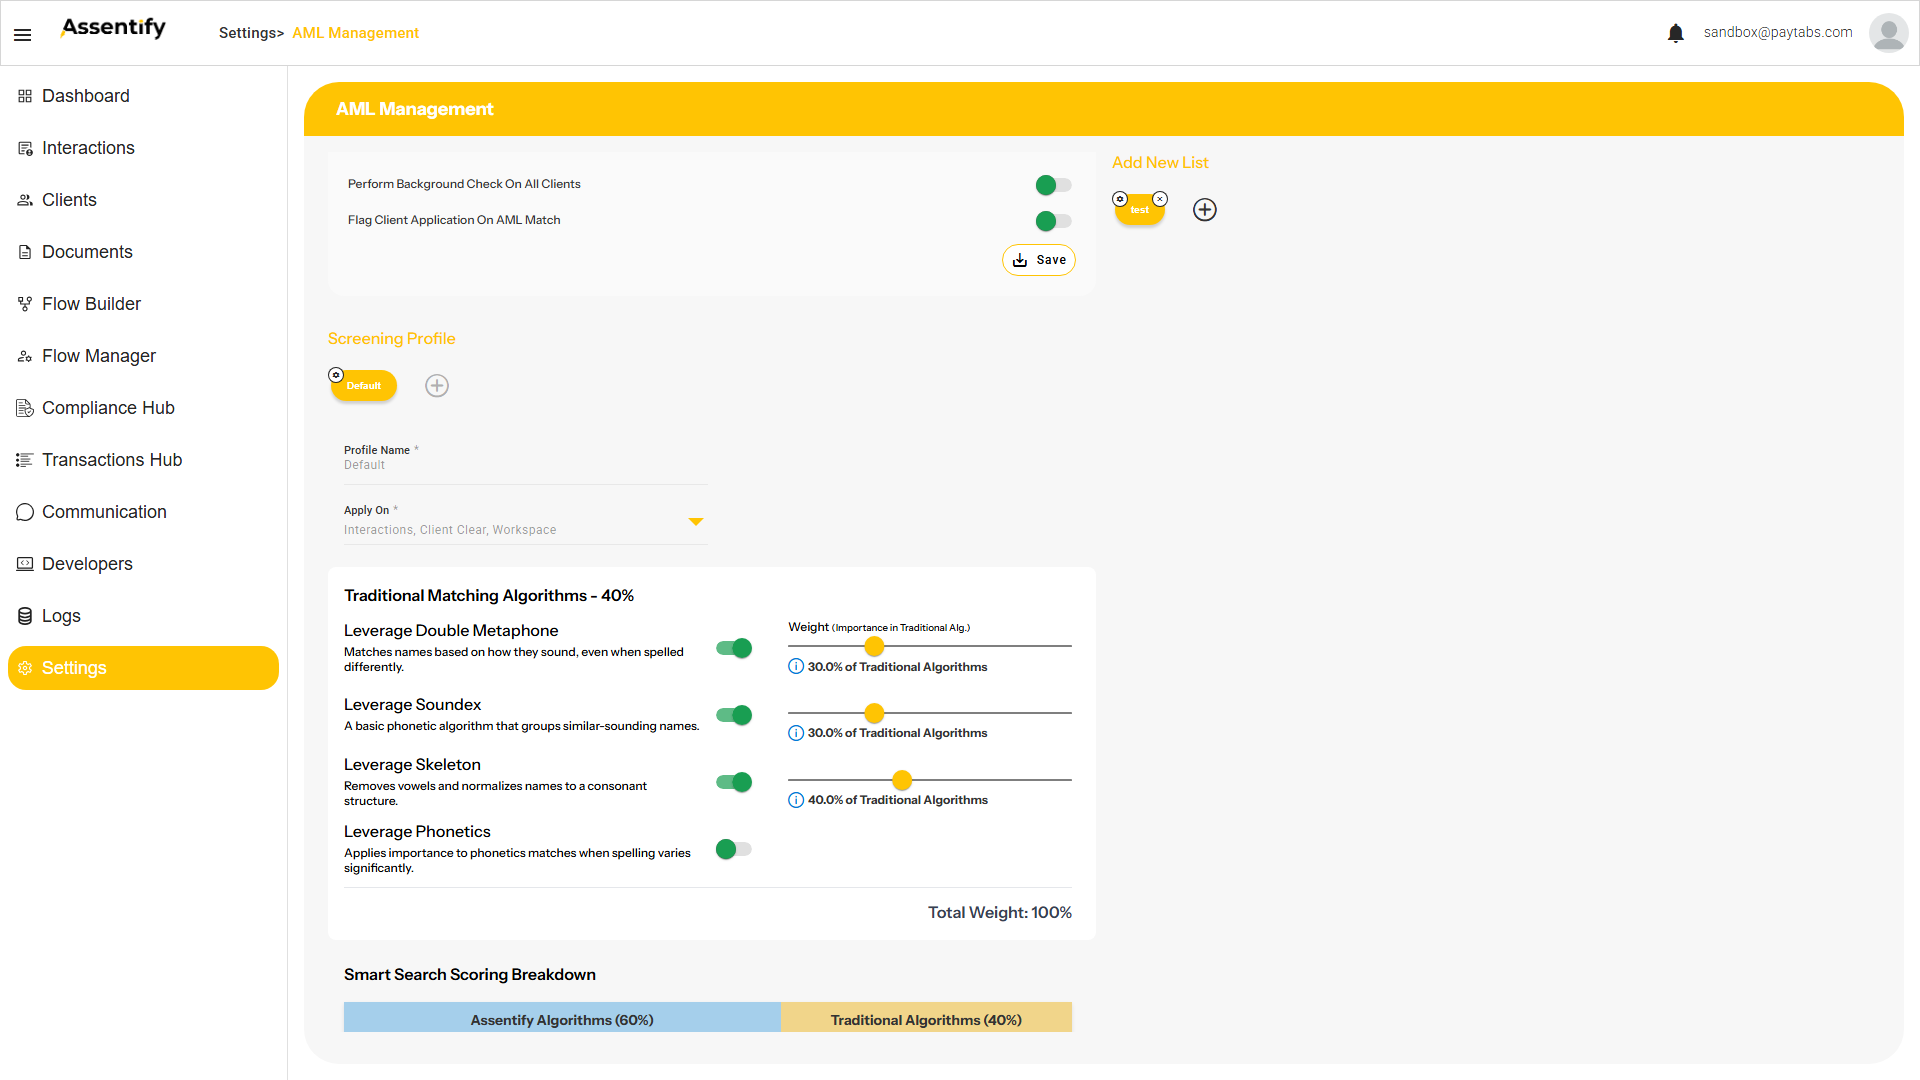
Open Settings, then AML Management. Two tenant level toggles sit at the top, and below them is the Add New List area where you maintain custom lists.
| Toggle | What it does |
|---|---|
| Perform Background Check On All Clients | Runs static screening against every client, not only flagged ones. |
| Flag Client Application On AML Match | Flags the application for inline review when screening returns a match. |
The most important block is the Screening Profile. The profile defines how the engine searches every time you press search in Workspace, Client Clear, or inside an inline review.
- Pick the Profile Name from the picker, for example Default.
- Set Apply On to the surfaces this profile drives: Interactions, Client Clear, Workspace.
- Tune Traditional Matching Algorithms, which carry 40 percent of the score weight. Each algorithm has its own toggle and weight slider, and the enabled sliders must sum to Total Weight 100 percent inside that 40 percent envelope.
- Leave AI Matching to carry the remaining 60 percent of the score weight.
- Press Save to commit the profile.
Traditional Matching, 40 percent
Four algorithms you can toggle and weight: Leverage Double Metaphone, sound based name matching for spelling drift across languages; Leverage Soundex, basic phonetic grouping of similar sounding names; Leverage Skeleton, which removes vowels and normalizes a name to a consonant structure; and Leverage Phonetics, which weights phonetic matches when spelling varies significantly.
AI Matching, 60 percent
Handles cultural and geographic variants, common typos, and transliteration. It carries the larger share of the score.
Advanced Features, the sensitivity knobs
Below the algorithm weights sit the Advanced Features. These are the core controls you adjust to balance catching every alias against generating false positives.
| Control | What it does |
|---|---|
| Perform Agentic AI Variations | A numeric intensity, for example 7. AI generates realistic name variants and aliases from linguistic patterns. Higher values generate more variants but more false positives. |
| Apply Transliteration | Converts names between writing systems before matching, set per list type. This is key for matching across Arabic and Latin script. |
| Fuzzy Matching | The maximum character differences allowed when comparing names, for example 2. Higher means a wider net and more false positives. |
| Max AML Smart Search Result | Caps the number of matches returned per screening, with Truncate if exceeded keeping the highest scored. |
| Min AML Smart Search Score | Ignores results scored below this threshold. Raise it to cut noise. |
RTRA, Real Time Risk Assessment
RTRA monitors live client transactions after onboarding. Configure it in Settings, RTRA Engine Configuration.
| Setting | What it does |
|---|---|
| RTRA Engine Life Span | How long, in days, a rule lives if marked Temporary. |
| Base Currency | The 3 letter code the engine normalizes amounts to. |
| Transaction Structure | Three entity types out of the box: Sender, Receiver, Transaction. Add more with the plus icon. |
| Include Realtime AML Screening Check | Ties RTRA decisions to a live AML check on the parties involved. |
Defining a rule, step by step
- Set Rule Name and Rule Span in days.
- If the rule is short lived, turn on Temporary Rule.
- Build the Rule Structure: pick the Entity, Attribute, Operator, and Value. Add more conditions with the plus icon.
- Pick the Action that fires when the rule matches.
- Write the Output Message that the system attaches to the action.
- Press Add. The new rule appears in the Defined Rules table at the bottom with Status, Type, and Remaining lifespan.
Risk Based Approach, RBA
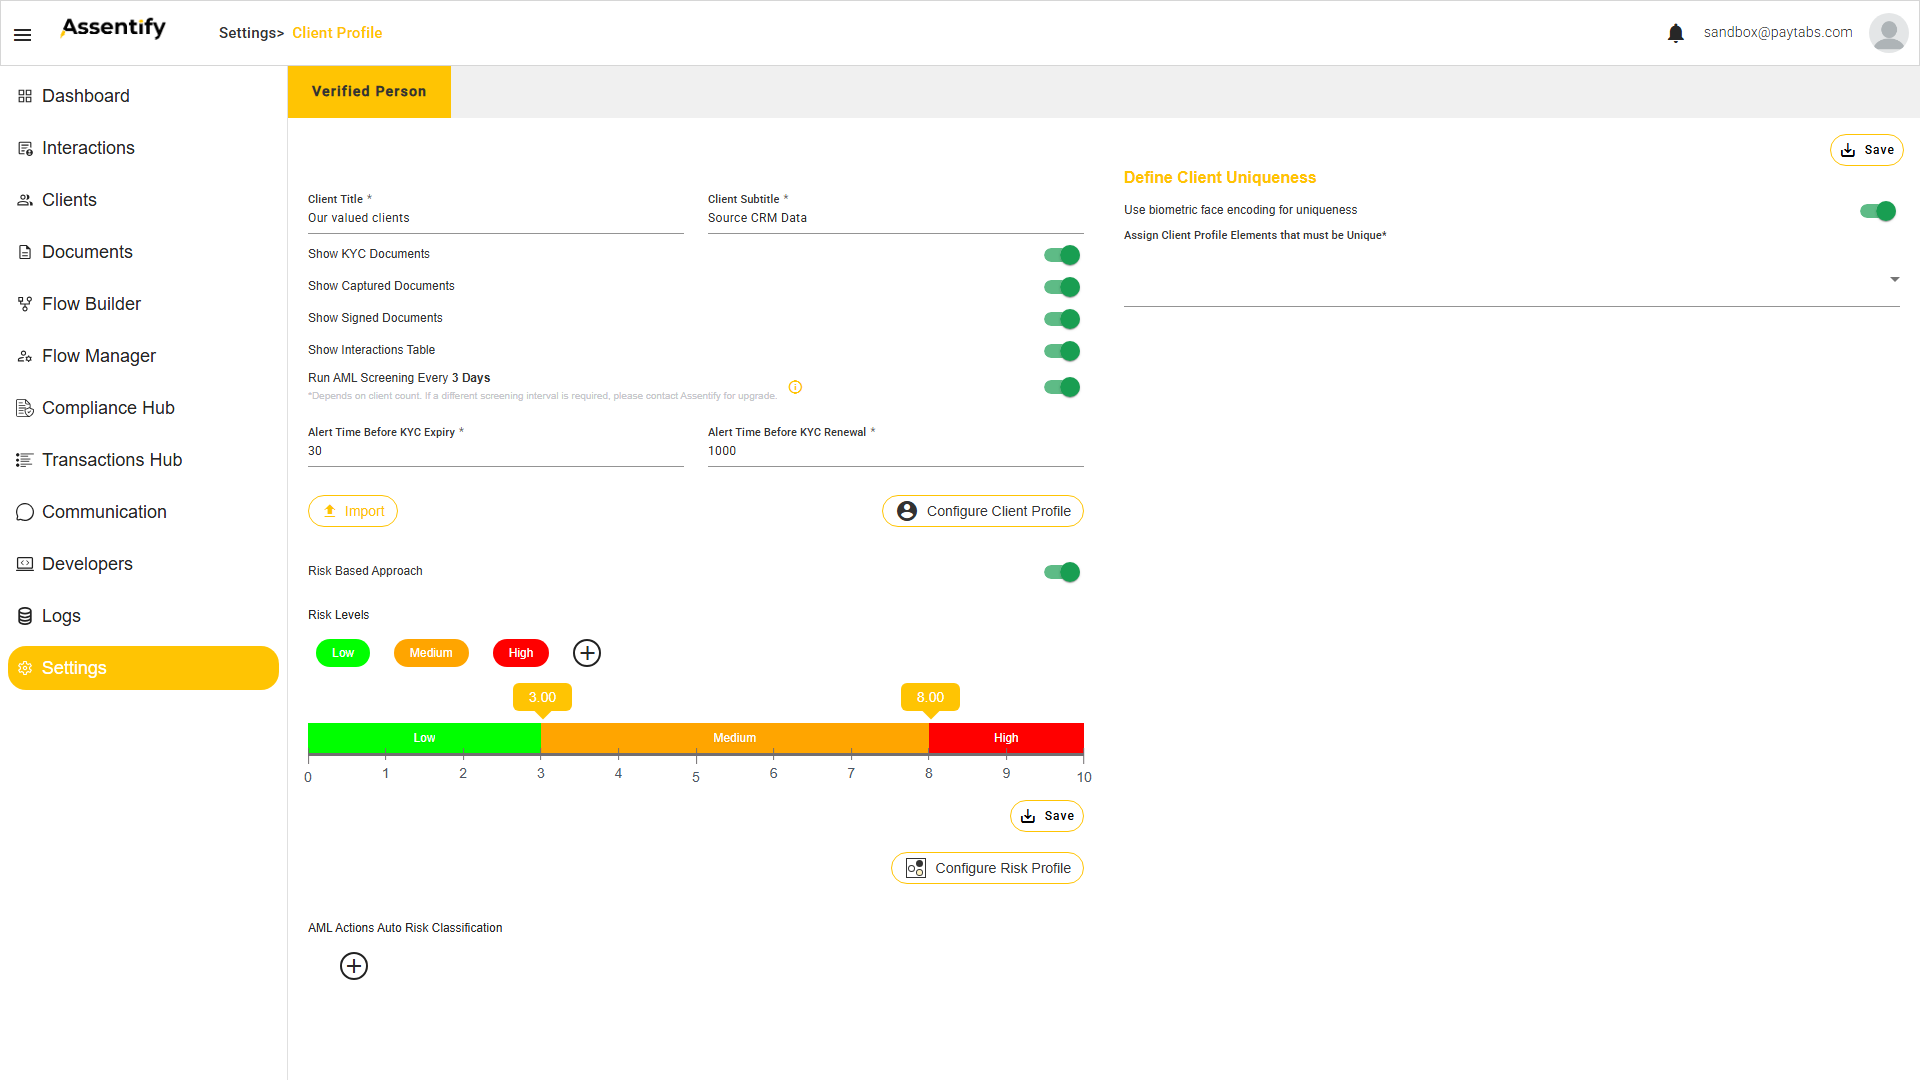
The Risk Based Approach produces an RBA Score per client. Configure it in Settings, Client Profile, per profile type.
- Turn on the Risk Based Approach toggle for this client profile type.
- Set the Risk Levels. Low, Medium, and High are the defaults. Add more tiers if your policy needs them.
- Drag the Thresholds on the 0 to 10 strip to mark the boundary between tiers. Defaults: Low 0 to 3.00, Medium 3.00 to 8.00, High 8.00 to 10.
- Press Save to commit the bands.
The RBA Score column in Client Clear and the Clients section uses these tiers to color and rank clients.
Where the RBA Score comes from
The bands set the tiers, but the score itself comes from Configure Risk Profile, which opens the Clients Risk Scoring Configuration screen. There you add a card for each data point you want to score, and each card sets a Risk Behaviour.
| Risk Behaviour | What it does | Use it for |
|---|---|---|
| Contributes to Risk Score | The value adds a weight. All weights sum to Total Weights, and the total lands in a Low, Medium, or High band. | Cumulative, additive risk, for example nationality, occupation, or PEP status. |
| Auto Classify on Value | The value directly sets the risk level and overrides the computed score. | Hard rules, for example a sanctioned country goes straight to High. |
Open Values Classification Mapping on each card to map every possible value to either a weight, for Contributes, or a target risk level, for Auto Classify. Watch the running Total Weights as you add cards.
- Press Configure Risk Profile.
- Press the plus to add a card, expand a flow on the left, then pick the data point.
- Choose the Risk Behaviour: Contributes to Risk Score or Auto Classify on Value.
- Open Values Classification Mapping and map each value to a weight or a risk level.
- Repeat for every risk relevant data point, then Save.
AML watchlists
Screening checks these lists. Custom lists you maintain run alongside them.
- US OFAC SDN and Non-SDN, including FTM variants.
- US Trade CSL.
- UK OFSI Targets.
- OCC Enforcement Actions.
- Interpol Red and Yellow notices.
- UN ISIS and Al Qaeda Sanctions List.
- UN 1988 Sanctions List.
- UN Security Council 1718, 1267 / 1989, Consolidated.
- EU Consolidated Sanctions.
- Politically Exposed Persons (PEPs).
- Lebanon: ISF Leb 24 (Internal Security Forces).
- Lebanon: SIC 18-26 (Banque du Liban Special Investigation Commission).
- Custom lists maintained by the tenant (Demo in the sandbox).
Audit and reporting
Every compliance action is captured in two places. The Compliance Hub Audit Hub gives the specialized view filtered by System User and Decision. The platform Logs section gives the complete platform audit by activity type.
| Export | How to produce it |
|---|---|
| End of session Workspace export | Use the Export Report button on each Workspace session. The Export Compliance Hub Report dialog offers Export To CSV and Export To Excel. |
| Audit Hub export | Filter by user, decision, and date, then press Export. |
| AML Screening History | Per client, exported from the client profile. |
| Custom List change log | Captured automatically for every add, edit, and bulk import. |
Open Logs to review the platform audit trail. Set the audit type to User Activities or System Audit, filter by date, and read Created, Activity Type, User Name, and Message. Press Export for a record.
Roles and permissions
The DXP supports custom roles built from claims dragged into a role definition. The recommended starting roles for this audience are below. Your administrator can adjust the claims to match your operating model.
| Role | Recommended access | Typical tasks |
|---|---|---|
| Compliance Officer | Compliance Hub (all four sub-modules), Clients read and edit AML status, Logs export. | Review inline matches, run Workspace sessions, action Client Clear, sign off RTRA flags. |
| Head of Compliance | All officer rights, plus AML Management, RTRA Engine Configuration, and RBA setup. | Manage lists, set thresholds, sign off policy changes. |
| MLRO | All Head of Compliance rights, plus Reports export and Settings read. | Sign off SARs, regulator submissions, and audit responses. |
FAQ and troubleshooting
A 100 percent match on a PEP, what do I do?
Open View More. Choose Confirm and Allow only if your policy permits dealing with PEPs and the business case is documented. Otherwise choose Confirm Match. Either way the client moves to High Risk.
Same person but on a Weak Alias entry?
Weak Alias matches are scored lower. Use judgment. The View More record explains why the source list treats the name as a Weak Alias.
How fresh are the international lists?
Every six hours, refreshed from each source. The Status sub-module shows the last update per list.
An RTRA rule blocked a legitimate transaction, can I let it through?
Yes. The Action menu on a fired rule lets you allow the transaction this once and write a note. The fired rule stays in the audit trail.
What is the difference between AML in Workspace and in Client Clear?
Workspace is a manual search you control. Client Clear is the continuous engine showing which existing clients matched on the last refresh. Both use the same Screening Profile.
Can I add a custom list?
Yes, if you have AML Management access. Open Settings, AML Management, Add New List, upload the file, map the columns, then save.